Pages

Tuesday, July 31, 2012

Restaging the Family Room-A Team Effort!

We actually bought a new piece of furniture....RETAIL....GASP!

The family room at Sweetwater is a wonderfully big room!
The furniture is a collection of pieces that have evolved over time.

The couch is big and comfy!
The leather chair and ottoman are a little aged but super comfortable!
The rocker is one that used to be in Mr. S's Grandpa's office!
The file cabinet is filled with about a million photos that I will sort SOON!
The coffee table is big enough to use as a dining spot for two empty nesters!

Well......the room works great when we have big gatherings...we pull in lots of other chairs....people sit on the floor...and lots of people can sit around pretty comfortably.

But....if it is just a casual small group of more than four people it always felt like there weren't enough comfortable spots for everyone.

Enter the NEW Loveseat....remember...the one we bought RETAIL!!!!

After waiting for six months it finally arrived last week.....Gorgeous....I love it.....
BUT....
NOW...
The whole room needed to be rearranged!
AND....
You probably remember just how fond Mr. S. is about rearranging furniture!!!

Sweetwater Daughter to the rescue!
She came....we pushed....we shoved....we angled....we tweaked...
After an hour or so, we settled on this arrangement.
Looks pretty good....

BUT....
 It just didn't feel right!
I tweaked some more....but still not PERFECT!!!

Enter the Sweetwater Niece!!

She came over yesterday to cover the gray roots in my hair.....
(hey don't hate me because I have a hairdresser who makes housecalls!!!)
She REALLY came so the Sweetwater Grand-Niece could come play with the new kitten!
I don't know which one is cuter!!!!

So anyway....we were sitting in the family room waiting for the dye to take....
I asked...."do you think this arrangement works?"
She replied...."almost....but I think the big TV Table is the problem...."

Long story short.....there we were:
 me with a baggie on my head and hair dye threatening to drip.....
a 3 month old baby on the periphery.....
a 5 year old and a 10 week old kitten dashing from room to room....

And my niece and I were doing a whole bunch of furniture moving.....
It involved unplugging complicated electronic connections for the TV...
Hoisting a gigantic table up a flight of stairs....
Moving an incredibly heavy file cabinet....inch by inch....
"Shopping" the rest of the house for the right lamps and lampshades....

But.....
SUCCESS!
WE DID IT!


 Scaling down the TV table....gave an extra foot of space on that side of the room....
Moving the file cabinet....gave an extra two feet of room for the couch and still left a walkway to the back stairs...
Putting the new loveseat on the back wall let us center it under the windows and the pictures.
The whole room has a spacious feeling with seating for 6 or 7 people....AMAZING!

Oh....and...my roots are covered....we had a lovely lunch....the baby didn't cry ONCE...
and the kitten was so tired from all the playtime that he slept the whole afternoon!!!

All in all...I would have to say this was a perfect example of the "Just DO IT" philosophy of Sweetwater Style!!!

And.....huge thanks to the Sweetwater Daughter and Niece for getting down and dirty and helping!!! 

As for Mr. S!
When he got home and I asked how he liked it....
His Answer:  "Great.....and I am really glad I didn't have to get involved!"

Whew!  After writing all this I think I need to go lay down in the family room and take a nap!


Friday, July 27, 2012

By the glow of "Fake" Candles

Excuse my scribbling, it is late, and I have a poor candle.
Henri Rousseau
 

A while ago I scored these three battery powered candles at "Bonne Volonté" (GW)!
I love the idea of battery powered candles....and hey for 2 bucks....can't go wrong....right?

But alas....everytime I turned them on and put them out....the Sweetwater son or daughter would say....

"Mom...Those are really lame!" 

They were probably right...
But...I couldn't bring myself to throw them out.....
hey...I spent 2 BUCKS on them!
And the other morning when I woke up at my usual 5AM and the power went out....they came in handy!

Then I was browsing the Target $1 bins the other day....AHA....these bamboo placements called my name....now...they WEREN'T $1... they were $2.50 but I bought them anyway!


The "fake candles" were still on the table....


 The "new" placements were sitting there.....


I had some empty tea cans.....


I had a glue gun....


EUREKA!
I Put them all together!
AND


I am not going to insult your intelligence with a tutorial on how to do this....
Really...


"Marvin" my new "blogging buddy" could probably do this!!!!
Just wrap and glue!


The tea can is there to give height and stability to the placemat...

You could use about anything....


Since it is broad daylight....I had to find a room with no windows and try to hold the camera still.....so forgive the lousy photo!

This little project only took 10 minutes....and cost $5 dollars....Not bad!

And the best part.....when I "light" these candles for a party, I can walk away with no worries about safety!

Seriously....how many of you find pools of wax on the bathroom counter "the morning after"!  Maybe that only happens at Sweetwater!!!

Now we will just have to wait for the Sweetwater Son and/or daughter to weigh in about whether these are still "LAME".....but maybe I will just ignore them!!!!


Wednesday, July 25, 2012

Help Wanted....I need Your Ideas!

Summer time for me always involves schools projects.
This summer I am working on a couple of really fun things!

My first project is....
Head Counselor at "Tech Camp" for some teachers at my school!
At "camp" we will be going on an iPad App Scavenger Hunt...
AND
Learn all about making iMovies using video from those iPads!

How Can YOU Help?

I know that there are lots of teachers out there who know way more than I do about great APPs for education.
I know there are lots of homeschool parents out there who are using iPads for instruction.

I would love to hear from YOU!

Leave a comment with your suggestions and experience with integrating iPads into REAL learning for kids!  The iPads are lots of fun.....but there has to be PURPOSE  in the way kids spend their time using them.  Let me know what you know/think!

I am building a resource list that I will share after "Tech Camp" is over.....

My second project is....

Collaborating with a fellow teacher 
on a Kindergarten Website for Spanish Immersion Learning.

We got a grant...yippee....and now we are working on an interactive website with Language Immersion activities for the Kindergarten Kids.
We are having a great time....and we think the site will be amazing....

One component of our website will be a Parent Information Blog!
My experience with writing "blog style" has made me a true believer in the advantages of communication via a blog!
Instead of the "old style" weekly newsletter.....you know the one that gets crumpled up in the backpack before you even see it....
The Blog format will provide ongoing-timely information that has endless possibilities....

How Can YOU Help?

I want to "pick your brains"!
What information and components do YOU think would be important to include in the blog?
What information is critical for you to have access to?
We would really like to hear...

Add a comment with your thoughts....
BTW...we have already considered the need to provide the blog content in printed form for those parents without ready access to a computer/or who prefer printed format.

One of the best parts of blogging is the ability to make connections with other bloggers/readers from all over.  So let the conversation begin...I will keep you posted on our progress...and share the completed website if you are interested!

Stay Tuned.....

Tuesday, July 24, 2012

One Way To LOVE Thistles!

He (SHE) that will bare-foot go must not plant a garden of thistle.
French Proverb

The thistles have made their yearly appearance in the Sweetwater Gardens! And yes....I go barefoot in the garden!
Every once in a while....I put on my heaviest gloves and attack these suckers....with a vengeance!  I never completely get rid of them....but it is satisfying to rip them up by the roots!

This post is sort of about cooking....you know I don't do many cooking posts....but the weeding the thistles made me think of one of our favorite vegetables.....Artichokes!

Along the way to posting how we prepare/cook/serve and enjoy artichokes...I got distracted!
In fact....this post might be the "poster child" for a POST by a blogger with ADHD!!

It all started when I was looking for some cool pictures of artichokes to make my blog look pretty!
Artichoke Art By Sarah Graham

Artichoke Art by Sarah Graham

I would love to have artwork like this.....but it probably won't happen....gorgeous though!
But look at this botanical print from Vintage Printables....
Hmmm....Maybe I could do something with this....a print....a pillow???!

The ever popular Graphics Fairy Site had some great thistle art!
I only spent about an hour browsing there!!!

But....now on to the cooking segment of this show!!!

If you already know how to fix artichokes....you can scan through the rest of the post pretty fast!
....but I do have a great sauce recipe at the end that is worth glancing at if you hate making Hollandaise sauce as much as I do!


 A couple of years ago....the Sweetwater Son called in a panic...(not really because the Sweetwater Son is really not one to panic about anything!!)....but he was making a nice dinner and he had artichokes and wasn't sure how to proceed....

Ahh...he needed advice from his MOM!!!

A fresh artichoke can be sort of scary looking if you don't know what to do with it....


So in a nutshell here is Artichoke 101.....


Take a big strong knife and cut off the top of the artichoke about an inch down....this is to get most of those pointy spine things off.....

Then cut off the bottom stem so that it can sit flat.....do the top first cuz then you have the stem to hang on to....sounds logical but it took me probably 10 years to figure this out!


Now use your kitchen shears to cut all the pointy edges off....yup....ALL of them...


Then it is just a matter of steaming them over a pot of water....you could boil them right in the water, but steaming is less messy.


I use this Calphalon "Everything Pan"...


It is just perfect for up to 4 artichokes....


Seriously....this is the best PAN EVER!!!

It is a go to wedding gift if you need one!


Anyway....put the artichokes in the pan....cover and cook until the bottom can be easily pricked with a fork...


Wish I could tell you how long....but just like when Mr. S. asks "how long will the artichokes take?"

The answer...."when they are done!"

I guess about 20-30 minutes mostly....
but it really depends on the artichoke....
remember...
it's a thistle....I suppose you have to expect it to have an attitude!


Then put them on a plate.....with some of this amazing "Secret Sauce"....(recipe to follow)


To eat....just peel off a leaf and dip it in the sauce...
Use your teeth to scrape the soft/tender part and discard the rest.
As you move to the center of the vegetable, the leaves get softer and softer...more good stuff!

When the last leave is gone...cut the "choke" or thistly stuff off and eat the tender base....
Remember...the choke is called that for a reason....it really sticks in your throat if you get some!!!
Secret Sauce (adapted from the South Beach Diet Book)

1/2 Cup Mayonaise
1 TBSP dry mustard
3 TBSP Worschestire Sauce

Mix together.....ENJOY!

Artichokes are REALLY good for you!
Yeah..you read that right!
Only 25 calories.....
Did I tell you that the "SECRET" of the Secret Sauce is that the calories DON'T count!
Just sayin'!

Thistles.....Gotta Love 'em!  

Oh....one more thing....does anybody out there know where I can find some artichoke plates...
I have 3....sort of an odd amount!  Would love to find some more!!!

Saturday, July 21, 2012

Tile Plant Markers

I was in my favorite garden store last week and saw these really cute plant markers made from glass tile and old forks....and they only cost $4 a piece...

I figured I could make them myself for like 40 cents a piece!

Of course I didn't take a picture....I should of taken a picture...

I did the next best thing...I went google image searching....and boy did I find some cute ideas for plant markers....and I will share!

First, I'll show you how I was able to replicate those fancy markers.

Supplies You Need


Old Forks.....Goodwill has them for 29cents each


Good All Purpose Adhesive

 Fine Point Paint Marker


Tile or glass pieces

Funny story about these tiles....I rescued them during a building remodel at one of the schools I used to teach at....

Maybe I will share some of these markers with other teachers who taught in that school with me.....hmmmm!


  I always feel sort of silly telling the how to steps for something this straight forward....but hey if I do, I can call it a tutorial! 

  1. Use the paint marker to write the plant name on the tile (let it dry)
  2.  Use the Adhesive to attach the tile to the fork (let it dry)
  3. Tie the raffia around the fork (add a little adhesive so it stays....let it dry)
  4. Stick the marker in the ground next to the plant.

Aren't you glad you read that tutorial?  I imagine you would have really struggled to figure this out by yourself....
so "you are welcome...I am glad I could help"!

Here are the other ideas I found for plant markers on the cheap!


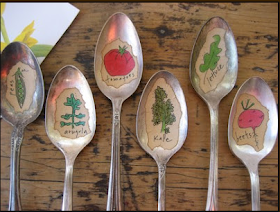
Love this idea using spoons and printed labels!

It was one of many examples on the Gardening Adventures Blog.


Carissa put together lots of ideas for Garden Bling here.

These are dollar store glass beads with paint markers.  Love the idea of the sticks and twine too.


Artsy Vava used corks stuck on forks....ooh I made a poem...

I never have luck writing on cork....it always looks easy....but alas I fail!!


This is just one of the ideas on the Buckets of Gardening Blog!

The flattened spoon is a nice look.
I don't know how to do the stamping...but I might want to learn...this is pretty cool looking.


Hope your plants are growing and you get a bit of inspiration for making your own plant markers....
Sad to say....since I made the marker for my lavender plant....it totally died....guess I have to head back to the garden store and buy another plant!  I'll be sure to walk by the display of garden markers and laugh at the price!

Have a great day!
Link Parties
Bowdabra  
A little Inspiration  Craft Envy  Be Different Act Normal   Family Ever After  
You Are Talking Too Much   Homemaker in Heels  CRAFT    
ALderberry Hill   Mad In CraftSumo's Sweet Stuff   
Making the World Cuter    Debbie DOes Creations  Sugar Bee Craftss   
Blackberry Vine   The Thrifty Home   Katherine's Corner  Rooted In Thyme  Beyond the Picket Fence 
Delightful Order    A Crafty Soiree  Craftionary   
Stuff and Nonsense  
Financial Friday    

Monday, July 16, 2012

Restaging In the Basement! Use What You Got Challenge!


The other morning I went down in the basement to start the big project of painting the new patio door that was installed in March!

This is a big project....
We love the door and it needs to be done "just right"...with white enamel paint....


which is why we have been putting it off!


On my way to get the masking tape and start masking....
The bench along the wall caught my eye!


I thought to myself..."Self...do you realize that bench has been in the same spot for more that a year?"  

Then I thought to myself...."Self....do you realize you still have about 4 yards of that blue and white fabric sitting in the closet?"

And so it began....
the "restaging" of the lower level family room for the summer!!

Read on to see how I AVOIDED painting the patio door and accomplished another Use What I've Got Challenge 2012!


The couch in the main floor family room already got this treatment!


Last summer I made small couch cushions out of the blue and white fabric.


But remember....I had LOTS more of that fabric...


So....I made gigantic pillow shams for the big couch cushions on the back of the couch!


But....NOW the little red pillows looked really out of place....and not at all summery!


 They got covered with a little remnant of white fabric with a rope design that was in the "fabric stash"!


I was ON A ROLL.....remember it was all about moving the bench with the box cushions!!!
Bummer....I needed to wait until Mr. S. was around to help move that heavy sucker!!!

Now....Mr. S. is not a big fan of furniture moving!!!!  In fact he gets this "LOOK" on his face whenever I ask...Maybe it is because when he asks..."Where is this going?"  My answer is "I won't know til we try it!!!!"

But....he was game....and only grunted and complained a couple of times....
Mr. S:  "Are you sure this is gonna fit under here?"
Me: "Yeah it has been here before, don't you remember?"
Mr. S: "No...but we are going to have to move the bookshelf so I can get the chest in! "
Me: "I know...just go to work and I will do it!"
Mr. S.: "Are you sure?  It is pretty heavy!"
Me: "Yeah but not as heavy as the sighing you are doing!!!"
Mr. S: "FINE!  I am leaving then!"
 So all the stuff on the bookcase needed removing and I huffed and puffed and got the chest in!!!!

TOLD YA it would fit!!!


It almost looks like a built in window seat with the cushions and a couple of pillows...

You can't see out the window....but the view isn't too bad either!


The rest of the room was a gigantic mess.....the way it always is when you rearrange....
I won't bore you with the details.....but after about 2 more hours....the room looked like this!


This post is getting awfully long...but I will bore you with some  "Use what I've Got" details.

The red ottoman was totally out of place in the new room....but we really like to put our feet up on this, so I didn't want to move it out of the room!
I found a blue and beige patterned tablecloth in the closet....


 I like the tablecloth and didn't want to cut it up....and I think I might want to actually recover the ottoman if I ever find the perfect fabric....

So I just used that masking tape I was supposed to be using to get the patio door prepped for painting.....and taped the tablecloth around the ottoman....
It'll do for now!!!!


I wanted a "beachy" look for the mantel...

We had a rope hammock in the closet that we weren't using to lay around in....

"Who has time to "lay around"?

I think it kind of looks like fisherman's netting....


So....to make a long story even longer....I hope this gives you the inspiration to take a look around your house and find a way to freshen things up without spending any money...
OR
At least it will give you an idea of how YOU TOO can find a way to avoid a job you don't want to do!!!

Oh....and I DID start the painting job.....and it IS as big a pain as I thought it was going to be! 


Wow....I was selected as the featured blog on Mikki's Flock Together Tuesday Blog Hop!
Hope you can take a minute and check it out! 
Flock Together TUesday
Link Parties