Showing posts with label organizing. Show all posts

Friday, January 13, 2017

Styling Shelves is SO Hard for me

Do any of you struggle with styling shelves?
I certainly do.
I always set out with great aspirations.
I always think that I will pare down and come up with a cleaner more open look.

BUT.....I sort of have THIS problem!


Case in point.....

All of these shiny objects called to me from the thrift store shelves.

I love interesting pieces of silver plate.  Especially when I can have them for around $5 a shot!

The collection is growing....

It lives on the shelves in the dining room.


I have a love hate relationship with these shelves! 
I want the pieces on display and easy to get at.
We use them all the time. 
BUT
Organizing/styling them is always a challenge.
I decided that this time I would get it right!

Sunday, July 26, 2015

Burlap Pocket Bulletin Board

I bought this burlap coffee sack at a little coffee shop a few months ago.

It was only $5.00.

I had no idea what I would do with it.....but the graphic look of the stencil was too cool to pass up.

I decided to update the message center in the kitchen with a pocket bulletin board.

The pockets on a board like this are a great way to have things right at hand without cluttering up your workspace or poking holes in photos or invitations.

Making the board is really simple.
Anyone who can use an iron and a glue gun can make one.

Sunday, February 15, 2015

How to Make A Custom Ironing Board Cover!


Ironing and ironing boards are not exactly exciting topics!

Actually.....I don't do a lot of actual clothes ironing....but if you sew....you have to iron!
My Grandma told me (correctly) that the iron was the MOST important sewing notion!


I will say that crafting and sewing take a real toll on an ironing board cover!


Yikes....this is seriously ugly!  I am not sure what the red stuff is....and the scorch marks were getting pretty bad.


It was actually getting so bad that I was laying down a protective tea towel when I ironed anything "nice"!

It was obviously time for a new ironing board cover! Because our ironing board is one of those "in the wall" built ins, it is kind of hard to find a cover that fits exactly. The ones for this model cost about $20 and come in GRAY or GRAY!  You know....that shiny gray metal color that is soooo attractive!

Sunday, May 18, 2014

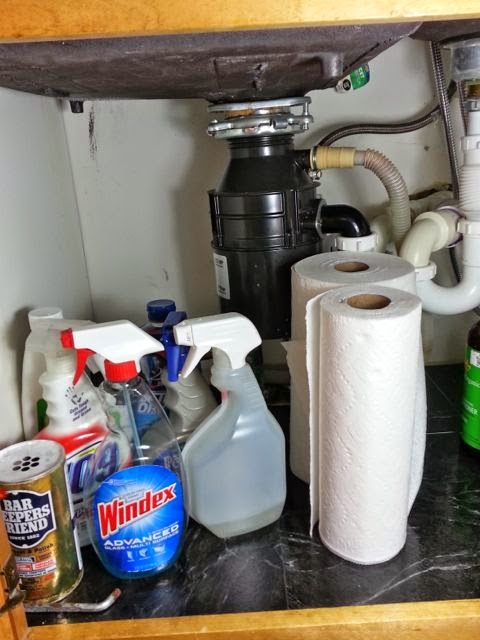
Under the Kitchen Sink! A Cautionary Tale!

On a scale of 1 to 10 cleaning the cupboard under the Kitchen sink is probably a 1or maybe lower!
Face it....if you can find the soap and cleaning supplies at the front....
it is better not to look way into the back recesses...
you never know what you might find!

Never the less.....my to do list included redoing the shelf paper under the kitchen sink....and the time had come!

The idea of using 12 x 12 stick on vinyl tiles was one I had seen a while back on someone's blog!  (If you are that someone....let me know so I can give you credit!)
Anyway........I bought 8 tiles at Home Depot....for 79 cents a piece....and the project was "under" way!

Low and behold....when I took all the stuff out of the cupboard.....I discovered that there was a LEAK!   Not a pretty sight!

I waited to take this photo until after I cleaned up the mess....just in case you were having a snack while you were reading!

Anyway....see all the curly cue pipes and "STUFF" that has to do with water and drains and garbage disposal......apparently they somehow got loosened and were leaking slowly and making a big mess!


 Since Mr. S is the plumber around here....(have I ever told you how nice it is to have someone who understands all those curly cue pipes around?...Well really nice)

He was able to fix the problem leak and I could get on with my project.


The process was pretty simple....

Peel Stick Repeat!


Peel Stick Repeat!


Obviously there were a few spots to cut around...

But remember.....this is under the kitchen sink...
That same spot that I didn't know was a leaky wet mess because I never look tooo far back.....


So perfection was not an issue on this project!


I did care enough to use the square and a carpet knife to get a straight edge for the long cuts... 


But otherwise.....I just "eyeballed" it for the cuts around the pipes in the back!


I don't think I did too bad on those....what do you think?


So now the cupboard should be easy to keep clean....I said clean....NOT NEAT....that is something that is probably never gonna happen!

Project Cost......$6.42 for tile
Time.....about 15 minutes to install
 "truth in blogging" has the project costing a bit more if you throw in the extra trips to Home Depot for plumbing supplies and the time to let the "plumber" work!

Hope you have a week with only "good" surprises!
I am waiting patiently for the yard to dry out enough to get out and plant....it promises to be a beautiful day!


Saturday, February 15, 2014

Cleaning Calphalon Pans!

I guess that I have to admit that I am a bit of of cookware snob!  
If it isn't Calphalon or Cast Iron.....you probably won't find it at Sweetwater!


The set of Anodized aluminum pans (Calphalon) were an extravagant purchase we made 25 years ago!


Wow....I thought $200 for 5 pans was a LOT OF money....and at that time....for us....it was!


But 25 years later....we are still  using those same pans and they look like new!


Well......they look like new NOW......after I spent some time cleaning them!

I don't know about you....but we sometimes do a less than stellar job of scrubbing the pots and pans after a meal....and the result looks like this!

Yeah....I know.....having dirty pans is definitely a FIRST WORLD PROBLEM!!!
But this was starting to bug me!


I DO know that the reason our pans have lasted 25 years....is because we have taken care of the anodized coating.... 
NO.....it isn't because we NEVER scrub them....but maybe just maybe...because we don't scrub them very often!!!

Anyway...this is what I use....it like the pans it is made for.... is expensive....$14 for this little container!
But with a little elbow grease it works amazingly well!  Because it is made for the Calphalon surface, I know that I am not damaging it!  I guess this is one of those times when spending money on the right "tool" is really thrifty.....


It isn't perfect....but pretty darn good! 
So it isn't even 9 o'clock and I have solved this FIRST WORLD Problem....But I created another one!


All that pot scrubbing just wrecked my manicure!!! 
Oh well....

Have A Great Day!


Wednesday, January 1, 2014

DYI Scarf Organizer

Happy New Year from Sweetwater!

This photo makes it look like Mr. S and I had some elegant, fancy New Year's Eve Celebration!

NOT!
We enjoyed NOT being with a crowd of people!

Just some leftover Alfredo Sauce served with some tasty scallops....
a couple of episodes of Boardwalk Empire
A glass of wine and early to bed!

It was actually a pretty nice New Year's Eve.
Hope yours was just as nice in it's own way!


Organizing is what you do before you do something, 

so that when you do it, 

you are not all mixed up.

A.A.Milne

Like the rest of the world....I have the organizing bug....just a slight case.....nothing serious, but I did clean a couple of drawers yesterday and I am determined to put the Holiday Decor away in some sort of sensible order with (GASP) labels on the boxes....

I did take a break from my organizing to do some blog reading....and of course it was the organizing tips that caught my eye....(maybe my organizing bug is more serious than I thought)!  
Irina's Cute Box
This post about a simple way to organize scarves caught my eye:

I am sure you can empathize with my bin full of disorganized scarves hidden under the bed....
They look that way because the only way to find the one I want is to STIR through them....YIKES!

I decided to make one of these organizers.....and since it was WAY below zero outside.....I wasn't going outside....no way--no how!
Mr. S....now that was a different story....he was on his way to Home Depot.....so I enlisted his help.
I also enlisted his advice.....hmmmmm.....and he came up with the idea to use PVC pipe joints!


He brought home a bunch....paid about 65 cents a piece for them....

They are nice and sturdy....but I was worried that because they are so deep, the hanger and hot glue would support them.

More advice from Mr. S.....use TWO hangers....


I got to work with my trusty glue gun....


First I arranged the PVC in one hanger and started gluing them together and along the edge of the hanger.


Then I slid the second hanger over the other edges of the PVC pieces and continued to add beads of glue until it felt secure.


It turned out like this.....not bad....and I like the fact that the 2 hangers will keep the bottom from shifting back and forth.  The depth of the PVC also makes it nice for thicker scarves.


This picture is NOT taken from the inside of my closet....why.....because I haven't gotten to the rest of the organizing that it needs!  The scarf organizer filled with scarves takes up about 5 inches of space in the closet....I plan to use it to keep the scarves I am wearing right now....the rest can just stay in the box under the bed!

NOW for the BAD NEWS!
You may have noticed that I did not title this post "Thrifty DYI Scarf Organizer"!
WHY YOU ASK?
Because after buying the PVC....
this little project cost the same or MORE than the scarf organizers you can buy!!!
Oh Well....I like mine better....and I didn't need to go out in the cold to buy one!


Happy New Year!
Stay Warm!

Sunday, November 24, 2013

Decorate Your Refrigerator in Style!


I have to admit something that might make some of you roll your eyes.....

 I absolutely refuse to clutter up the refrigerator with the collections of family photos, coupons and notes!

I think it is probably my cluttered brain that can't handle MORE clutter in the kitchen....but hey I don't mind looking at this clutter in OTHER PEOPLE'S kitchen....REALLY....

In fact....I often find myself enjoying those same collections of STUFF in OTHER PEOPLE'S  kitchens and thinking....WOW....they have such interesting lives!!!


The other morning I was looking at the bare white side of the refrigerator which abuts the computer desk where I spend "A LOT" of my time!


Now even for me.....this was a bit on the sterile side!!!!

HMMMMM....what to do?


This is the simple and easy solution I came up with!


A framed Christmas Card....of a cityscape in Winter....


6 round (pretty strong) magnets glue gunned (is that a word???) around the perimeter....
I already had some in my "craft stash", but I might just buy some more!!!


And in less than 10 minutes.....and a few trips up and down the basement stairs to see if I had used enough magnets  (until Mr. S suggested that I try out the magnet strength on the BASEMENT REFRIGERATOR...instead of walking up and down the stairs...well duh!)
I now have an uncluttered but less sterile refrigerator to look at!


Oh....by the way.....at Sweetwater we DO have all those pieces of daily life around here...
this is the solution I have come up with that doesn't make me crazy!!!

It looks to me like this could use some organizing too!!!! 
A project for another day!!!
Here is a post with the Tutorial for making this message board!

Back to the framed art on the refrigerator...
I am imagining all kinds of ways that this could work...
Framed pictures of kids.....
Framed pictures of vacations....
Collages.....Scrapbook Pages....

Leave a comment with YOUR ideas.....or slap me down for being such a refrigerator SCROOGE!

Have a GREAT DAY!


Wednesday, November 20, 2013

Super Easy Tip: How To Hang A Sweater

All those trips to Good Will mean that there are lots of sweaters in my closet.....
I have a "couple" of drawers full....
I have a "couple" of under the bed storage bins full....
I DIDN'T have "hangers" full of sweaters because I have never been a fan of shoulder "nipples"!
You know...the bumps that happen when you hang up a sweater!

So when a friend showed me this trick....it was an "AH HA" moment!
This is how to "fold" a sweater over a hanger!

Start by folding the sweater in half along the center!


Lay the hanger on the sweater so the hook is in the armpit! 


Fold the arms over one side of the hanger!

Fold the body over the other side!


AH HA....a perfectly folded sweater on a hanger!

I think I will only use this for my really bulky sweaters.....
I don't think it would be a good idea for Mr. S to actually see ALL my sweaters in the closet!!!
Better if some of them are behind closed "Drawers"!

Have A Great Day!


Link Parties

FLuster Buster  Katherine's Corner     

Tuesday, August 21, 2012

Getting Ready To Party Series! #1

This is the front of the invitation we sent inviting our relatives to come celebrate the end of Summer.
I can't wait.....and it should be fun....because....

Wouldn't YOU want to party with this stylin' group!

Mr. S and I love to host events here at Sweetwater!
We have it down to a pretty good system....and it is pretty stress free!
I thought I would share some of what is going on behind the scenes as we get ready for our party on Friday evening! 


My friends will tell you that I am not much of a list maker....in fact if I had to check things off on a list....that would stress me out!


I always laugh when I see those handy check lists for planning a party....my word....most of them have you planning for months to have a simple party! 


 but if you WANT a check list....

For heaven's sakes.....other than deciding on the date/time/theme and sending invitations....you really shouldn't need to start preparations for a party more than a week ahead of time!

The party is four days away....and this is what I am doing today!

  • Defrost the turkey so it can get smoked on Thursday!
  • Hard-boil some eggs for egg salad....
  • Clean the deck....
  • Hide some clutter....
  • Polish the furniture and get rid of some cobwebs....
  • Get out the trays, baskets and other serving items 
  • email people who have volunteered to bring food to share....
  • decide on the "flow" for the different party areas....food, beverages, dessert
I think I can handle this and still find time for a nap!!!


Since the weather forecast promises a beautiful summer evening, I know that people will be out on the deck.


 I did some pretty brutal dead heading of the flowers in the planters....

Why!!!

By Friday they will be back to fresh blossoms....


I also bought a couple of $2 mum plants to fill in the spots that looked sad.....

hey....I am worth it!


 Come Friday....I will flip the chair covers over....this side is faded and dirty.....and
oooh....I looks like I need to do take a couple of minutes to disguise the pots in the planters on the deck.... 


I dug out the old fabric from the bedroom drapes.....


cut it into squares.....tucked it around the nursery pots with some spanish moss....


and in 10 minutes....no more ugly nursery pots.....
Now....did I do this just for the party?   
NO.....but the party was the motivation!  And I will get the benefit for days to come!!!

Here is my new favorite thing on our deck.....

Since the only way we can have herbs and lettuce at Sweetwater is on the deck because all the bunnies and deer would love it if we planted in the garden.... refuse to be their suppliers!

.... Mr. S. gave me this awesome Triolife planter for my birthday....I have been wanting one for a long time....


A tiered planter is a wonderful space saver....the one we had been using was plastic....and definitely showing it's age.....you can imagine how happy my new planter makes me!


I suppose a clever DYIer could make one...but they have them at Amazon if you are interested!
Back to party prep....

We moved the bench to the seating group....I will move the rose bush on Friday.....and now with a little bit of cleaning and sweeping, the deck is all set....


The solar twinkle lights will recharge and be all ready to set the atmosphere for lovely conversation area at the party!

Stay tuned for Getting Ready to Party #2....tomorrow will be menu planning.....don't be expecting a lot of recipes....remember....this is a stress free party planning series!!!

Have A Great Day....I am going to go sit in the sunshine on my shiny clean deck!!!!


Related Posts Plugin for WordPress, Blogger...