Thursday, February 26, 2015

Drool Bibs For the Sweetwater Grandbaby!


"I can't think why mothers love them. All babies do is leak at both ends."   Douglas Feaver   
 Isn't that the truth?
I have been sewing up some pretty cute drool bibs for the Sweetwater Grandbaby!

There are tons of tutorials and patterns out there! 
The Bandana Bib seems to be popular.....but personally....I think all that fabric up by the baby face is cumbersome!  If you like that look...here is a link to a pattern and tutorial!

Since there are many tutorials out there...I won't bother to write one....so check out the links I have found!

Sunday, February 22, 2015

A Fabulous Student Drama Production!

"Let's Put on a Show!"
That is exactly what happens at Park Spanish Immersion School every year!

Under the direction of an amazing educator (and one of my favorite friends)....over 50 kids work together to stage a musical production!

This is no small feat!  The script and music needs to be written IN SPANISH!  Funny...there aren't too many ready made Spanish scripts out there....so they have to be translated!  

Kim works hard to create a production that includes as many children as possible!
The many volunteers who work on scenery, props and costumes are pretty amazing!
Since there isn't a lot of money in the budget....everyone needs to be "pretty creative" to find inexpensive ways to make this happen!

I had the pleasure of helping with costumes this year! 

Sunday, February 15, 2015

How to Make A Custom Ironing Board Cover!


Ironing and ironing boards are not exactly exciting topics!

Actually.....I don't do a lot of actual clothes ironing....but if you sew....you have to iron!
My Grandma told me (correctly) that the iron was the MOST important sewing notion!


I will say that crafting and sewing take a real toll on an ironing board cover!


Yikes....this is seriously ugly!  I am not sure what the red stuff is....and the scorch marks were getting pretty bad.


It was actually getting so bad that I was laying down a protective tea towel when I ironed anything "nice"!

It was obviously time for a new ironing board cover! Because our ironing board is one of those "in the wall" built ins, it is kind of hard to find a cover that fits exactly. The ones for this model cost about $20 and come in GRAY or GRAY!  You know....that shiny gray metal color that is soooo attractive!

Wednesday, February 11, 2015

Healthy No Blender Smoothie!

I just love Smoothies!
I have a wonderful VitaMix Blender that is great!

But sometimes....I am too lazy to get the VitaMix out...
and
I am too lazy to clean it after I blend up a smoothie!

Here is a quick solution!
No Blender needed!

Sunday, February 8, 2015

Customized Fabric Covered Wastebasket Tutorial

I was thinking that  I haven't been very crafty around Sweetwater lately!

Actually...my crafty skills have been busy helping design and create costumes for a Drama Performance at my old school. The costumes are amazing and fun head pieces instead of full body costumes.  The fun part is that the kids are heavily involved in making the costumes themselves....so I am more the "director" watching over flying fur and feathers and glue guns! I will write about that another time when I have pictures!

On to the transformation of this rather mundane plastic wastebasket into a customized fabric covered gem!!

There is really nothing wrong with it!
Except it is the wrong color for the decor in my Yoga room!

There was no way I was going to spend any money on a wastebasket.....

Time to get my craft on!

Time to use what I had!

Monday, February 2, 2015

Longing to Grow Something!

The Sweetwater Grandbaby, Daughter and I spent last week in Florida visiting my Mom and Brother!
The Florida natives kept talking about how "COLD" it was.....but for the Minnesotans....65 degrees and sunny didn't seem "COLD" at all!

In the airport....a lovely lady informed us that we needed to bundle the baby up to keep him warm!  LOL...we wondered what the heck she was talking about!

My brother is a "Permaculturist"...meaning he plants the most amazing sustainable gardens....one of which is the entire front yard of Mom's Florida cottage!
Imagine looking out over a front yard filled with every kind of lettuce and other vegetable you could imagine!  Simply Gorgeous!

Here is the Sweetwater Grandbaby pretending to be a "Cabbage Patch Kid"!
He simply relished the soft air and sunshine in Florida.....it has been freezing for almost every day since he was born two months ago!


Alas....after a few short days....we were back in the frozen north where green grass and gardens full of vegetables are just a memory!

 
What to do?


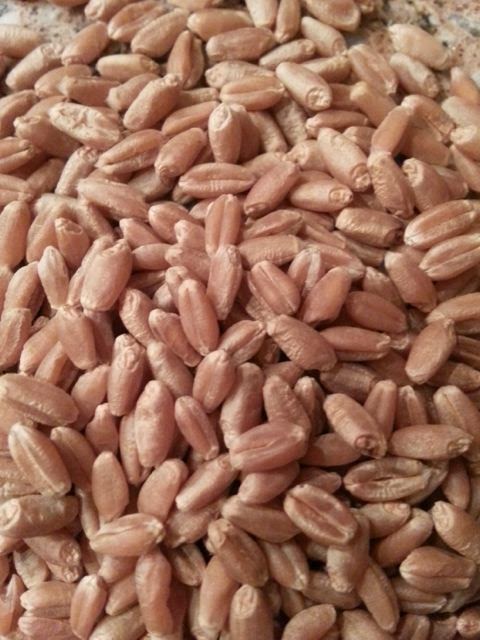
I planted some Wheat Grass for a try to find a touch of spring!
I have posted about growing wheat grass  before....but here is a refresher!

The process is simple!


Here is the RECIPE:
Ingredients:
Hard Red Winter Wheat Berries 


 These are just wheat seeds that you can buy in the health food section of most grocery stores....

I have been getting mine in bulk from Amazon....
Typically they cost less than a dollar a pound.

Potting Soil
I use Miracle Grow Moisture control....but any dirt will do!
Plastic wrap   Water  Sunshine


 Directions with a Sweetwater Disclaimer:
You could search the internet and get fancy complicated directions about how to grow wheat grass....
You could get all OCD about sorting, sprouting, draining and carefully laying those seeds in the dirt....
BUT....Since you read this blog....
YOU can do it Sweetwater Style....and it will work!
Back to the SIMPLE HOW TO:
  1. Soak a bunch of seeds in water for a couple of hours. (DON'T soak them too long or they could get moldy)
  2. Find a fun waterproof container.....almost anything will work...I sometimes use plastic food container tops.
  3. Put about 2 inches of soil in the container and water that down a little
  4. Spread the pre-soaked seeds evenly over the soil.....almost like frosting the dirt...yes that thick!
  5. Water this well....not sloppy wet...but wetter than you would normally water a plant
  6. Cover the container with plastic wrap to make a little "greenhouse" for your seeds!
  7. Place the container in a sunny window.
  8. Wait a couple of days....Check....add water if it looks like it needs it....wait a couple of days more.... 
 You (and your cat) will have GRASS!

Not only does the Wheat Grass make a nice decor statement.....You can use it to make juice!

So while I may not be in sunny Florida this week....I can get a start on the growing season this way!

Have a great day!


Link Parties
Boogie Board Cottage Between Naps on the Porch    
Burlap and Babies   The Dedicated House Katherine's Corner  

Saturday, January 24, 2015

Practical and Thrifty Baby Shower Gift Ideas!


Buying a Baby Shower gift really isn't very hard!

A quick trip down the baby aisle of any store will give you lots of options....

You can go into "cute overload" in no time flat!


While every new Mom loves the cute outfits and blankets....here are some practical and thrifty gifts that might be appreciated even more!

Great gifts are those that make life easier for the new parents!
Great gifts are multiples of the things that are going to get used often!


Baby Burp Cloths

There are lots of fancy burp cloths on the market....

The reality is....they don't need to be cute....
They need to be practical....easy to wash and bleach!

CostCo sells 24 plain white terry washcloths for $10.99! I also like the packs of wash cloths at HomeGoods...6 for $4.99.  They come in colors if that is your choice.

They make perfect Burp Cloths!


 Changing Pads

These hand towels from CostCo ($15.99 for 12) are super nice.  A hand towel is the perfect size to put under baby when it is time for a change.
Again....the beauty of pure white....easy to bleach!

These towels have lots of other practical uses.....it is nice to have dedicated kitchen towels for baby items. 


Baby Toiletries
A plastic bin with a cover filled with the basic toiletries for the baby is always welcome.
, , , , , and .  The plastic bin will be useful after the "stuff" is all gone!


Breast Feeding Necessities
NO......just a MOM and a BABY are not the only things needed for breastfeeding.  New moms don't always know what they need....so if any of these breast feeding items will be wonderful to have from the start.
Breast Pads, Nipple Cream, Nipple Shells, a nursing pillow, and milk storage supplies are all necessary items to have on hand. 


Nursing Shawl
 If you can sew....this tutorial for a DYI Knit Nursing Shawl is for you.  The directions are super simple and the whole project could be made for under $10.
There are ready made options out there too.
HMMMM....I am thinking I need to get into my fabric stash and make one of these for the Sweetwater Daughter!


BOOKS
 Some people might not say that BOOKS are a NECESSITY!  I would definitely DISAGREE!
My Number One "Go To Baby Gifts" are books!  Here is a post with some great suggestions!  In fact....a fun idea for a Baby Shower t is "A Virtual Book Shower".  Simply do an evite with the address of the parents to be and ask people to send a favorite picture book!  Hopping to an online site like Amazon and ordering a book is quick and easy!  This is a nice way to have a shower which includes people who live a distance away!


Did you figure out that the ulterior motive for this post was to put super cute pictures of the Sweetwater Grandbaby on my blog?

Have a Wonderful Day!
Link Parties
It's Overflowing   

Sunday, January 18, 2015

Make A Birch Branch Heart Tutorial!


This Birch Branch wreath in this photo is one that the Sweetwater Sister-in-Law made for me long ago.  It is a perfect accent for any Valentine display.

(BTW..I found this photo on last year's post with a round up of other people's Valentine Ideas....VALENTINE IDEA POST)

 Back to the wreath tutorial....

I have a whole bin full of birch branches leftover from Christmas....
They are cluttering up the garage.....

HMMMMM....I was thinking I could make a smaller version of the Heart Wreath...

How hard could it be???
Well it turns out it was a tad bit harder than I thought....but I did figure it out (with a little help from a friend)!


 I went looking for some other versions of branches shaped into hearts...!


This one is so simple and clean looking!

I couldn't find the original website...but it looks like it is from an Etsy Shop.

This would be something fun to make with kids!
Source


This is very similar...the little stuffed embroidered heart and ivy are sweet additions.


If you have access to Red Dogwood branches.....this would be something stunning to hang on your door....


Check out the tutorial here for this one.....


This is the Sweetwater Birch Branch Heart!
It fits perfectly in the kitchen window!
 
When I made this yesterday.....I didn't take any pictures.....so I did another one this morning to show you the step by step process.


I started with six branches.
They are about 2 1/2 feet long....but obviously the length of the branches will determine the size of the heart....so you decide how long to make yours!


Separate the branches....Three to a side!


Cross the bottoms of the branches over  each other and wire them together with paddle wire.

Make sure the wire is VERY secure or your branches will be too floppy for you to manage the next steps.


Take the tops of each side.

I twisted and shaped each side into an arch....it will want to pull back straight....but by doing this you create some bend in the branches.


Then bring the tops together in the center top and pull down.

Wire this together too.


Here comes the tricky part....

After I wired this together....the top kept springing up and not staying in a heart shape!


I had pretty much given up....
I was considering trying to shape it by soaking the branches or steaming them...

And then....MY FRIEND CAME TO MY RESCUE,,,,

I showed her the dilemma...
I showed her the original heart wreath....
SHE NOTICED....that there was a WIRE running from the top of the heart to the bottom!


 SEE.....a piece of wire from the center top is pulled down and wound around the bottom.


Now the branches make a nicely shaped heart!


The extra twigs on the branches are woven into the heart.

I did put a couple of pieces of wire around the sides to secure the branches.


Since the paddle wire is green....and...I had some red raffia....
I tied some at top and bottom to conceal the green wire!


These hearts could be made in any size.....
....maybe a row of small ones propped on a mantel
or
....really small ones tied into a garland!

  I hope YOU have good friends who help YOU solve YOUR Problems!
Have A Great Day!

Link Parties
Eclectic Red Barn   Katherines Corner   
Kammy's Korner    
Funky Polka Dot Giraffe    
Stone Cottage Adventures  I An Not A Trophy Wife  

Thursday, January 15, 2015

Indoor Garden Planter


January blahs.....we all get them!
One way to combat the dreariness of a long Minnesota winter is with house plants!

Big houseplants can get expensive.....but you can get the same impact by grouping a bunch of smaller plants together in a big container!

This good looking metal container was a Goodwill bargain.
I lined the bottom with plastic (just in case the seams aren't completely water tight) .
Then I placed  a variety of plants in smaller pots into the big container.
I was lucky to have a taller plant and one that trails a bit....


Take out containers were used to raise some the shorter plants up to the top of the container.

Then some Spanish Moss tucked all around the base of the planter hides the edges of the pots.


I was at a wonderful garden store yesterday.  I splurged on some poppy pods and dried mushrooms on sticks....$20....but I knew they would take the planter from basic to pretty special!


 Guess What!  There are actual scientific studies that show some actual health benefits that house plants can provide!


 In my never ending quest to educate you all....I found some great articles about those benefits.

This article from The Mother Nature Network has a beautiful slideshow of plants that improve your indoor environment.


"Houseplants will keep you healthier and happier. Multiple studies have found that indoor plants can offer psychological and physical health benefits,* including:
  1. improving your mood
  2. reducing fatigue
  3. lowering stress and anxiety
  4. improving performance and focus
  5. boosting healing and pain tolerance
  6. minimizing the occurrence of headaches by improving air quality
  7. easing dry skin and respiratory ailments due to dry air
Many houseplants absorb toxic substances such as formaldehyde, benzene and trichloroethylene, found in man-made materials that are known to “off-gas” pollutants into the air in your home, school, and office. In addition, a study done at Virginia Tech led researchers to conclude that houseplants can reduce indoor dust by up to 20%.
Indoor plants release water vapor into the air, which increases humidity. This can help improve respiratory and skin health by offsetting the drying effects of heating systems.
They also increase oxygen levels in the air by absorbing carbon dioxide and releasing oxygen during photosynthesis."  (http://swansonsnurseryblog.com/2014/10/10/health-benefits-of-houseplants/)

SO NOW YOU KNOW!

I know that this orchid certainly improves my mood  and lowers my stress!
The light in our house seems to be just what orchids need to thrive!
This orchid is the Valentine Mr. S gave me almost a year ago!
It has been blooming ever since!


It is sitting on a mirror on the big ottoman in the living room.


The mirror reflects the orchid....
a nice effect I think!


I plan to spend some time making sure that there are some green plants in every room!
Very Feng Shui don't you think!

Have A Wonderful Day!
Link Parties

Friday, January 9, 2015

Sometimes it's the Small Victories!

I have been spending a bunch of time with my head in the toilet bowl lately!
Anybody know the source for this? 
NO.....thank heaven I don't have the flu!
(knock on wood....or porcelain)

I have been dealing with a pesky problem!

Yup....that dreaded lime scale ring where the top of the water in the bowl sits.

We are pretty good about keeping the toilets clean here at Sweetwater.....but over time....I am afraid to say that this lime scale thing was building up!!!

Now....I know this is NOT a huge problem....in fact it is pretty minor in the big scheme of things!

But....it was bugging me!
www.thewellnesswarrior.com.au

I made the decision that I was gonna figure out the solution and fix the problem!

I did a bit of research....always the first step in the problem solving process!  
(don't I just sound like a librarian?)

I came upon this website:

Jill's Home Remedies  and she had a way to remove the ring.....you can hop over and read about it!

But let me show you how I eliminated the ugly rings in the toilet bowls at Sweetwater!

I had all of the ingredients for the secret potion:

Borax
Vinegar
Sandpaper
I definitely had the lime scale ring in the toilet bowl!
YIKES!  I am actually a little embarrassed to show you this...
BUT....truth in blogging!


I simply poured some of the borax and some vinegar into the bowl instead of emptying the water and making the paste like in the how-to article.
I suppose it was about 1 1/2 cups of borax and 1 cup of vinegar.
I waited about 10 minutes and then got impatient....go figure!

The idea of using sandpaper on the porcelain made me nervous...
I was afraid of scratching the surface....
I started using steel wool at first....no success!
Then I remembered the sandpaper covered foam block we have...
I knew that was a nice fine grit...
I checked it out by sanding a spot WAY UP under the rim....JUST IN CASE!
Really....NO scratching...
Because it is such fine grade sandpaper.....I did need a bit of time and elbow grease!
OH MY!
LOOK!
 I would definitely claim this as a success!

I was soooo excited to show my work to Mr. S....I loved his comment:
"You know, don't you, that nobody will ever appreciate all the work you did to fix this?  But they probably would notice that it wasn't done."

If you think about it....isn't that what almost ALL housecleaning is about?

I have one more toilet bowl to go....but it will be worth it!

Related Posts Plugin for WordPress, Blogger...