Thursday, February 21, 2013

The Evolution of the Dining Room!

 My latest project....recovering the dining room chairs has taken me on a trip down memory lane....so I hope you don't mind traveling there with me before I show you the project!


Do you remember....
.......the days BEFORE Craig's List....?
.......the days BEFORE it was TRENDY to be THRIFTY?

The house we lived in before we moved to Sweetwater had no formal dining room.
I resigned myself to the fact that this room in our new home would remain empty until our budget could accommodate the expense of dining room furniture....


Now even though there was no Craig's list....our favorite furniture store had a discount area called "The Odds and Ends Room"...and we were frequent visitors there.

On a visit shortly after our move.... we found a great Thomasville dining room table that was big enough to seat 10.....for a great price!

I found an image of a similar table so you can see the way it looked when we bought it!


A few weeks later we found "almost" matching chairs.....at a discount furniture store for an amazing $40 per chair......they had ugly beige nubby fabric on them....but they were $40 a chair!


The first fix was to recover the chairs with fabric that looked nice with the federal blue walls....


Can you believe how "country" this fabric is?

But the colors were versatile and looked nice with the beige lacquered wood....hey.....it was the '90s!!!


The walls got painted a creamy brown....and the "country" fabric on the chairs looked so so!!!!


Once again....time for a change!
The family thought I was crazy when I chose this zebra print.....and created slipcovers.

Too funny that now animal prints are all the rage....
"EXCEPT"....

Fast forward a few years...even though animal prints are trendy.....these chairs have seen lots of dinners and the fabric is showing it's age!

Time for another change!
(Are you thinking..."Finally....she is getting to the project"?)

YUP!!! 
Here Goes!!!


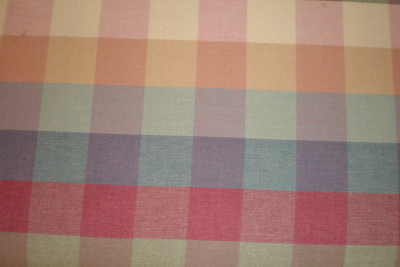
A trip to the fabric store almost a month ago resulted in the purchase of this great fabric!
Perfect....but I couldn't seem to get in gear to start the project!
 I finally got started on Monday thanks to this great tutorial that Julie over at Sew Passionate posted....Her instructions are complete and easy to follow....her technique made me itch to get started....

I was thrilled to learn her tricks...


Making the pattern by pinning and trimming....made the process "almost" easy....

And the technique for sewing the chair seat to the back with a "tuck in" piece...

You really need to read her tutorial.....it is awesome!

 of course I adapted the process a bit.....but the tutorial was ever so helpful!

I have one chair almost done....and the pattern pieces cut for two more....Here is a sneak peak of the first chair almost done except for some hand finishing....


Are you noticing that the legs on the chair aren't beige lacquer anymore?
Well neither is the table.....
another part of the evolution story....
I will share that another time....

Now, I just need to do 7 more chairs.....maybe by July!!!!

Wish Me Luck!!!

I would love to hear how your furniture has "Evolved"....
And if it hasn't....maybe this post has inspired you!!!

Hmmmm......$400 table......8 $40 chairs......a little fabric....a little inspiration....
20 years of thrifty style!!!

Have A Great Day!


Sunday, February 17, 2013

Make Your Valentine's FLowers Last Longer

Did you get flowers from your special someone for Valentine's Day?

I "sorta" did!
I told Mr. S. he didn't need to send me flowers....
He "sorta" listened....
On Wednesday this beautiful arrangement was delivered to me at school!
He told the florist that the flowers shouldn't look like a Valentine!
The message on the card was NOT a Valentine Message!
But.....alas....I ignored him and considered them a Valentine anyway!!!
Thanks Mr. S!

I kept the flowers at school until Friday when I brought them home.

All those pretty flowers were still looking fresh for a couple of days.

This morning.....I noticed that a few were looking droopy!

I soaked some floral foam....
Got out this great looking silver bowl (a find at GW a couple of weeks ago)....

I took the florist arrangement apart....
Made new cuts on all the flowers that still looked fresh....

Here is the result!


Not bad...if I say so myself!!!
Mr. S. told me he thinks it looks nicer than the florist's arrangement!
Maybe that compliment is nicer than the actual flowers!

I figure I can keep taking the drooping flowers out....
keeping the spirit of Valentine's day for at least another week!

Have a Great Day!!!

Link Parties

Friday, February 15, 2013

Simple Centerpieces on the Cheap!

We needed 8 centerpieces for the tables at the staff party last weekend!
My budget for decor......basically $0....we wanted to spend our money on food!

What to do?


These little cuties were the perfect answer.

It just took a little planning ahead....

The wheat grass got planted in 8 pots of a similar color....I used greens and golds!
(Good thing I buy lots of pots at GoodWill)
The grass needs about a week in a sunny window to grow to the height of 4 inches.


I really splurged and bought a bunch of daisies at the grocery store for $7.99.
Normally....I think those bright-artificially dyed flowers are really ugly....
but for our "Taco Fiesta" theme the colors seemed just right.

The next step was tucking a 2 inch cube of floral foam in the center of the pots....
Then....the flowers....
Then a little curling ribbon....
and 

Here they are....waiting to go the party!!!


Wheatgrass Centerpieces

 It is funny....I never have any pictures of the actual parties I go to.....maybe that is because I would rather BE at the party than take pictures....but then I am sad that I don't have pictures.

I will try to get some from the people I saw running around with cameras....

Anyway....the food was great....
because we could use the budgeted dollars for that instead of decorations...!

AND....cheap looked pretty good don't ya think?

Fresh flowers

 Have a Great Day!


Saturday, February 9, 2013

Valentine's Day....It's Really About the Chocolate!


I have to admit that I haven't done much decorating for Valentine's Day....

In fact....I haven't done too much decorating PERIOD!

Work has been super hectic....seriously....

I think there were 1000 kids and adults visiting/using the Media Center on Friday!!!l

Then....I am on the committee planning and putting together tonight's staff party. 

AND...we had our week of "secret friend" gifting too.....

Yikes! No wonder I haven't had time to do much at Sweetwater....


The baker's rack in the kitchen is about the only spot with Valentine Cheer!


It isn't much.....but it is a little bright spot paying homage to the holiday!
Oh and thanks Mr. S. for the flowers....they add a nice touch!

I thought about doing some other things....even went out to pinterest looking for some ideas!
I probably won't get around to doing any of these cute things, but thought YOU might!

I can't read Japanese....but this tutorial for making a heart garland with fleece was easy enough to follow....

http://www.duitang.com/people/mblog/17103792/detail/

I might actually find time to make this.....and the candle might keep me from eating the candy!
 
http://livingonloveandcents.com/2013/01/30/easy-and-inexpensive-diy-valentine-decorations/
http://www.amandajanebrown.com/

Yeah...for sure I could do this....and the bow makes it even cuter....don't you think?

Sarah over at Alderberry Hill is sharing these great chalkboard ideas.....her blog is becoming one of my favorites!

http://www.alderberryhill.com/5-valentine-chalkboard-printables/

Maybe I will erase the "OH BRRRR" and do something for my chalkboard! 
That wouldn't take too long!

Are you wondering when this post is going to get to the part about CHOCOLATE?

I love Hot Fudge Sauce!
You know...the kind that sort of slides down the ice cream...
and settles in a yummy pool at the bottom of the dish!


This is the recipe for THAT HOT FUDGE!

Only Three Ingredients
Directions
  • 1/2 cup of butter softened
  • 1 cup  chocolate chips
  • 1 can(14 oz)of Sweetened Condensed Milk
Get out a medium sized saucepan.
Melt the butter over medium heat.
Stir in the chocolate chips,
Add the Sweetened Condensed Milk.
Stir until everything comes together....it will take a couple of minutes.
You know it is done when it gets smooth and silky looking.

This can be stored in the refrigerator for a long time.
I do have to warn you....
you might just find yourself sneaking spoonfuls of this yummy concoction with no ice cream....just by the spoonful!  Not that I would ever do something as uncouth as that....I'm just sayin' it might happen to you!

If you are that room mother who is planning the Valentine Party for your child's classroom...make a triple batch of this....buy some ice cream and your treat will be a sure fire winner!

If you are wondering why there are no pictures of this recipe being made in the Sweetwater Kitchen....well....I have this on my TODO list too....but now that I have written about it....off to the store for the ingredients....this post made my mouth water!


Have a great day! 

Saturday, February 2, 2013

Perfectly Simple Glazed Green Beans!

The winter weather here has really given me the BLAHS....below zero days and nights make me CRABBY!

Even "Date Night" at the Theater was a bit of a downer...."Long Days Journey Into Night", while beautifully acted and staged was DEPRESSING!  And walking from the car... to the restaurant... to the the theater....to the car....it was darn cold!!!

We have a tradition of going out on the "never ending bridge" in the theater to look out at the city and the river.  We have done this every single time we attend a play....
Alas....this sign on the door greeted us this week....and now our perfect streak is ended!
But enough whining.....since I haven't been doing much for projects....I will do one of my rare cooking posts.....because regardless of the weather....you gotta eat!

Here is my recipe for Green Beans Sweetwater Style!

I used to hate green beans....

maybe it was growing up being forced to eat those soft, mushy canned versions... seriously...do these beans even LOOK green? 


Then I watched Julia Child cooking green beans and it changed my view of this vegetable forever.  Her technique is so simple and fool proof it can hardly be counted as a recipe!

Now...maybe everyone in the world knows how to do this!
But maybe....you have just been boiling your beans and plopping them on the plate!

If so....if you follow these steps....you end up with a crisp, tasty, never fail side dish that looks like something you would get in a fancy restaurant.

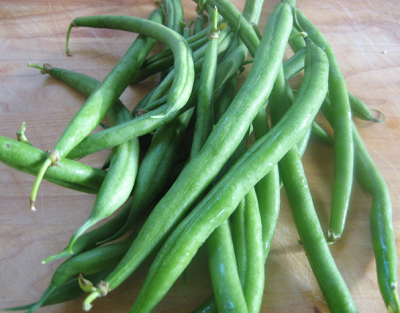
 I love that you can buy green beans ready to cook...with the ends already snapped.....
Sometimes we are lucky enough to find a mix of green, yellow and purple beans....it doesn't much matter as long as they are crisp and fresh to start with.

Start by putting the beans in a pan with a little....and I do mean little... water!

 Bring the water to a boil and cook until the water is almost gone....the beans will start to get really bright and green...when the water is gone the beans will still need more cooking time....and that is the trick to this technique!


 Add a couple of tablespoons of butter to the pan......hey....I didn't say this was a low cal recipe....just a delicious one.


 Keep the heat high as you let the butter melt....keep stirring so the butter coats every little bean in the pan....but don't stop there!!!


Keep stirring and cooking as the butter almost carmelizes on the beans.  (now do you see why you don't over cook the beans before you add the butter?)

When the butter is completely coating all of the beans.....add a bit of salt and pepper....


 And there you have them......Perfectly Simple....Perfectly Delicious Green Beans!


Thanks Julia!!!
Bon Appétit!


Related Posts Plugin for WordPress, Blogger...