Showing posts with label reupholstery. Show all posts

Monday, July 17, 2017

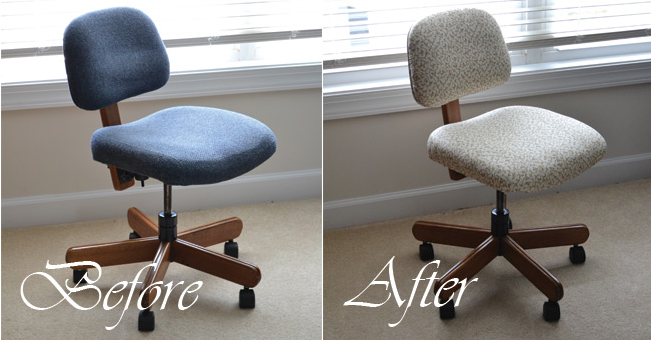
How to Upholster an Old Office Chair

 Yup.....we all have at least one office chair.
An office or task chair is one of those necessities that you really can't do without.
Even new ones usually lack any kind of decor charm.
The one in my sewing room IS NOT new.....and it certainly has no charm!

I learned to "upscale" an office chair a couple of years ago to make an eyesore part of the decor.

I could not believe how easy it is to do.
Well....it is easy to do if you have the right KIND of chair.
Notice that the cushions on this chair are inserted in a plastic frame.
All it takes for this project is:

Some really pretty fabric!


AND.....a couple of really basic tools.


It is just a matter of cutting two pieces of fabric the size of the cushion with about 2 inches of overlap.

Most decorator fabric is 54-60 inches wide.
You only need about a yard of fabric to do both the back and seat cushion.
But of course you will need to measure to be sure!


Cut the fabric to size.
Round the corners off to reduce the amount of fabric as you go around the frame.


It is a simple matter to just push the fabric in between the plastic frame and the cushion.


The putty knife usually works well.
Sometimes the screw driver helps to pull the frame out a bit to get the fabric started.

Make sure to pull and stretch the fabric tight.

One suggestion is to do part of the top, then part of the bottom, and part of each side.  This helps you get a tight fit.
Finish by going all the way around.

There is plenty of give in the plastic to get the fabric in there.

For about $10 and an hour of work time...the ugly utilitarian necessity....now looks like part of the decor!


When I walked by the framed poster that was hanging in a different room....I said "AHA!"
The colors couldn't be a better match.

Here are a couple of posts I did a few years ago that give even more details.


The "manly" desk chair for Mr. S.


The "old version" of my sewing chair.


I hope this inspires you to upscale your own chair.

Have A Great Day!
Link Parties
Coastal Charm
Make It Pretty Monday 
I DIYed That 
Eclectic Red Barn

Tuesday, May 16, 2017

Summer Decorating on a Budget! Part One!


Source
Time for summer decorating....bright, fresh, and airy are words that come to mind.


Lightening up the look of the family room was the first step in the summer transformation here at Sweetwater.

When we got the new oatmeal colored couch, I no longer need to slipcover the cushions with summer weight fabric.


(Read about how I used to do this with the dark colored couch using stretch twill for cushion covers that are almost no sew)


The color scheme in the family room was pretty autumnal with all the browns and copper.

Pretty.... but definitely NOT bright, fresh and airy!

Thursday, April 21, 2016

Almost No Sew Removable Ottoman Cover

It's time for Part Two of the Kate Spade inspired mini-redo of the guest bedroom.
Yesterday was all about pink polka dots!
Today....it is all about green and white stripes!


 You have to admit that these two prints are iconically Kate Spade!


This is the green and white fabric that I found for accents in the room.
I did want a little brighter green more like the color on the Kate Spade bag....

BUT....when you find something this close to the inspiration and it only costs $.90 a yard...
YES...$.90 a yard...
There was really no question about the purchase!


I liked the idea of an upholstered ottoman to sit in front of the love seat!
This little bench turned ottoman is the perfect size!

Saturday, June 6, 2015

Lighten Up! Summer Look For The Couch!

Summer is really here!

Time for the couches at Sweetwater to change into their Summer wardrobe!

Summer calls for smooth, cool fabric and a lighter color palette!


It is pretty simple to make "pseudo summer slipcovers" with very little sewing!


I love how changing out JUST the cushions on the couch creates the Summertime feel I am after!

Saturday, July 12, 2014

Super Simple Almost NO SEW Ottoman Slipcover!

Recovering an ottoman can seem like a daunting project!
It doesn't have to be!
If you have an hour....
If you can sew a straight seam...
You can do it!

Would you believe THIS....?


looked like THIS just a couple of days ago......?
I think I recovered it (poorly) over 15 years ago and it was time for an update!!!

The process was pretty simple....but of course I forgot to take pictures!
BUT....

Saturday, August 31, 2013

The Epic Saga Of the Dining Room Part III

Part three of the Epic Saga of the Dining Room will finally be the tutorial for the Parson Chair Slipcovers!

This might explain why I feel like this has been an "Epic Saga"!

Picture 1: the original upholstery that we did when we bought the $39 chairs.....reupholstering these was a real pain....the backs had to be popped out...covered and then popped back in....did it once....but never again....hence the slipcover project!
Notice how very lazy I was when I re stained the legs....didn't even do the whole chair frame...HENCE...the SLIPCOVERS!

Picture 2:  My animal print slipcovers....the ones my family thought were soooo weird....until animal print became all the rage!!!

Picture 3:  The ill-conceived fabric choice and the Part Slipcover/Part Upholstery style that I gave up on after 3 chairs!

Picture 4: FINALLY....the right fabric and a simple streamlined slipcover that looks updated and JUST RIGHT!

Follow along to see how to make a slipcover!

I wish I could say these were NO SEW....but alas....the only way to do this is to get out your sewing machine!

Step 1:  I actually made a muslin pattern for this project so that I had good pieces to work with when I cut the actual fabric.  Check out this blog post that gives a great explanation of pin fitting a slipcover for a Parson's Chair.  SEW PASSIONATE PIN FITTING A CHAIR

Step 2:  Cut out all your pieces!  This type of slipcover has 3 pieces....chair back, chair front and seat!  I cut all 24 pieces at once (YIKES that is another reason this is an EPIC SAGA...3 pieces times 8 chairs!!!)
Anyway...if you cut all the pieces at once, you can save fabric...I was able to do a layout that left me with enough fabric for a whole extra chair...in case we ever have a stain that won't come out!


Step 3:  Lay the seat piece on the chair.  Make a cut that leaves the"tuck in" as well as the side flap for joining to the back piece.


Step 4:  Pin and then stitch the miter which will form the tight corner on the front of the seat.

Trim this excess away after you are certain that the fit is correct.


Step 5:  Pin the front and back pieces together with wrong side out....

I also use a pencil to trace the actual line of the frame....it seems no matter how carefully you cut your pieces...they don't match up perfectly.  The pencil line lets me sew the perfect line and the finished seem doesn't have bumps or puckers.


Step 6: Of course I forgot to take any pictures of this...but you simply sew the front and back together along your pencil line.  The back is attached using the extensions from the seat piece.


This photo shows the "loop" of fabric that will become the pleat at the back corner of the seat.


Step 6:  Do a final fitting of the three pieces....tucking in your "tuck ins".  I did not sew this together like many tutorials do.  I thought it would be easier to get a good fit.

Because I may need to wash these....I did finish all the edges with the serger.


Step 7: Use a ruler to measure and pin the hem.  When you sew the pieces together...the bottom often shifts so this is critical for an even hem on each chair.  I was awfully glad this pattern was so forgiving.


Step 8:  Make the pleat by tucking and hand sewing the back seat corner.  I find that I have more control when I do this by hand....but maybe one of you experts out there know a secret for doing this better!


Step 9:  Hand stitch the hem....now I know you could do this by machine, but again...since all of the chairs sit side by side....the hems have to be exactly the same distance from the floor...and the hand stitching lets me do some tweaking!


Repeat Steps 1-9......OVER AND OVER AND OVER....EIGHT Times in my case!

It sounds like I am complaining.....I am NOT!

The whole look of the room has changed....for the better....


And with the Sweetwater Daughter's help and the newly edited living room....
I am really pleased with the look of both rooms....just a few more tweaks in the next weeks and I'll be done with the updated rooms!


So ends my EPIC SAGA.....
Did you know....that it took Odysseus ten years to reach Ithaca after the ten-year Trojan War in the Epic Saga the Odyssey....so I am awfully glad my EPIC SAGA didn't take quite that long.

If you are frustrated by my lack of tutorial writing skills.....

This video is a great one to watch to get clear directions for making a similar slipcover


Have a Great Day!

Link Parties

Thursday, November 3, 2011

Am I crazy or what? My latest Project!


Imagine the school library where I spend an awful lot of my time from Sept. to June....
oh you don't have to imagine...it looks something like this!
The color and layout of the space are really nice!

Well I guess "Sweetwater Style" extends to my work environment too!
I am constantly rearranging the furniture....decorating the tables....hanging up art!
My mission is to create a warm and inviting place for learners (adult and student) can spend time!
Sort of "if you decorate it ....they will come!"
And given the state of school funding....this all has to happen on a less than minimal budget!

Do you see the blue chairs in the foreground of the photo?
Well there are 20 of them....and I decided to recover them....

So now you understand the title of this post!
Read on to see the plan....I have 2 done and have 18 to go!

Monday, October 24, 2011

Goodwill Chairs Make Over!

 My blogging has been put on hold the last days because I have been sooo busy living my life....no time for projects!
BUT....
I got this great email from my daughter  while we were enjoying ourselves in Memphis this weekend!
SHE was doing a project and is letting me share it with you!


Email text: Hey Mom....Look what I did!


$4.99 for each chair from Goodwill
plus $12 for paint and fabric from the fabric box!


Who says the pumpkin doesn't fall far from the pumpkin patch.....?


Here is how she did it!

Monday, October 17, 2011

I recovered another office chair!

You may remember my post about recovering my husband's ugly office chair!


It went from really ugly.....to nice...but sort of boring....that's because I actually listened to what he wanted...."nothing too fancy or wild"....go figure!
The post has the full tutorial if you are interested.

Now... on to MY sewing chair that looked like this!

If you have been reading this blog you know that I am not afraid of "fancy or wild"!
So off to the fabric store....and see the great fabric I found!

I bought 1 yard for $7 and I was ready to turn ugly into NICE!

Wednesday, October 5, 2011

Kitchen Stool and Message Board Updated!

Saturday we took a long overdue trip to SR Harris Fabric Outlet.
I now have supplies for more projects than I have time for....and inspiration for even more!

One purchase was a yard of pretty print to recover the stool that I sit on in front of my computer.

The stool is a $3.00 Thriftstore buy with the legs painted to match the other chairs and stools in the kitchen.

This is the way the stool looked at 1 o'clock Sunday afternoon....a year's worth of me sitting on it in gardening gear had it looking a little worn and dirty.


This is the $5.00 yard of print that I bought....I always buy too much at the outlet....it seems so cheap to buy less than a yard!
Read on to see how it turned out!

Friday, August 26, 2011

Marimekko Art On the Wall For Less!

Marimekko — means “Mary's dress”


maybe that is why I have always been drawn to these iconic patterns!

I think I may be a little "old" to wear a Marimekko dress.......

BUT:


If you look around my house or in my fabric stash you will see that I often pick patterns that are reminiscent of the designs from this Finnish company.
My research for this post took me to the MarimekkoWikipedia entry and I found the history of the company fascinating.
Read on to see the way my daughter found to have a piece of Marimekko art on her kitchen wall!


Wednesday, August 17, 2011

I Did It-Recovered An Ugly Office Chair!

The 12 year old blue office chair is the first thing you see when you come down the stairs to the lower level in our house.  Yuck!

I saw this tutorial at Made by Meg and knew that I could "just do it"!
Here is the inspiration photo. Meg's tutorial showed me the way! 
Photo from Made by Meg
Add caption
Here is our ugly blue chair!
See why it was bugging me!

You will have to read on to see how it turned out!


Sunday, July 31, 2011

Side Table Revamp-Leather Look for less!

This is what I want! 

Home Shopping Network, $199.95

At that price this table is really pretty affordable.  But still,  $200 for a table that is going to sit in an out of the way spot seems like a lot.
This table was stuck out of the way in the lower level on it's way to the GW drop off.


The awful finish is the result of a less than successful attempt at faux painting---arghhh!


I am pretty pleased with the results.  Not perfect, but certainly better than before! Read on to see how I did this!

Saturday, June 18, 2011

Power Tools AREN'T Just For Dads!

Before I talk about tools, let's take a moment to celebrate all the great father's out there! Since my own dad is no longer here, I will be celebrating my children's father, but remembering mine with great fondness.
My Dad and me a very long time ago!
Like Father, Like Son!

Old as she was, she still missed her daddy sometimes.  ~Gloria Naylor


A trip to New York....see the Twin Towers...!

 Now about those power tools.  Manicured nails or not, I have my own power tools and know how to use them!  Getting over the fear of using power tools has made such a difference with my projects.  If you don't have any-start asking for them for gifts-way cooler than some sweater that won't fit and that you could find cheaper at GoodWill!
Here is a list of tools that I use....and a slideshow of some of my favorite projects that I used them on.
Related Posts Plugin for WordPress, Blogger...