Showing posts with label flower arranging. Show all posts

Monday, June 17, 2019

Peony Hack!

It's finally time!
The peonies are blooming!


Okay...We admit to being just a little peony crazy around here.
Maybe 20 plants is a bit of overkill, but each one is special. 


I love using peonies in arrangements.


BUT....

I hate how quickly the blooms fade or fall apart.

I tried this little hack this year and am quite pleased with it.

The trick is to let the glass container support the blooms.
That way the flowers stay together for a lot longer.


I love the way these colors are enhanced by the glass.

You may remember this vase from the arrangements of tulips using the same technique.


This rose bowl is the perfect way to use the trick.  The Coral Charm and Yellow Garden Treasure blossoms are particularly prone to dropping petals and fading.
These lasted for 4 days in the rose bowl.


Other People....parade pictures of grandchildren or vacations.....
Me....
just a few of my favorite flowers!


It is too bad that they don't last longer.


I wrote a post a while ago about a way to keep some peonies in the refrigerator to extend the season.
Read about that here:  How to Extend the Peony Season


I didn't feel that ambitious this year.  Maybe it is because my plants are blooming later this year and when they are done, there will be lots of other garden blooms to enjoy.

Anyway...I leave you with this thought!


Pinterest


Have A Blooming Great Day!


Friday, April 12, 2019

Tiptoe Through the Tulips!

The weather outside is frightful.....yes....3 days of snow in APRIL!

Tulips to the rescue!
I can't think of a better antidote to the white landscape than a bunch of colorful tulips!

Monday, July 30, 2018

Flower Arranging: How To Keep Them In Place

This is the time of year to sit back and enjoy the fruits of gardening labors!
A stroll through the garden will reap lots of flowers to make arrangements with.
If you don't have a garden spot, the local Farmer's Markets can supply you with flowers for very little money.

So many people tell me how intimidated they are about arranging flowers.
Knowing how to support and keep the stems in place will take the mystery out of flower arranging.
Once you know these different tricks, your creations will have that professional look you want.

Floral Foam (the wet kind!!!)
This is by far the easiest way to create a formal arrangement. Floral foam lets you have the stems come out at angles.  Your ability to control the arrangement is limited only by your artistic eye. Once you create the arrangement, keep the foam hydrated and it will last a pretty long time.  Floral foam CAN NOT be reused successfully.  This makes it sort of an expensive option. Amazon has the foam for a couple dollars a block.  But the more you buy the cheaper it is....I just ordered 36 blocks for 20 bucks...but then....I do a lot of flower arranging!!!

Flower Frogs

A flower frog is a glass or metal object with holes in it to hold and support flower stems. There are glass, metal and ceramic frogs.  It is a good idea to watch for them at the thrift store or yard sales.
Sometimes I use these as pencil holders.


According to hearthandvine.com "It seems that no one knows the origin of the term “frog,” though most agree it must have become a slang term for the fact that they sit in water, like a frog. ... In the mid 1950s, however, a water-absorbent foam, called “Oasis,” was invented, driving the flower frogs to near extinction. "  

Tape Cross Hatch Grid

 You can create a cross hatch of floral tape on the top of a vase if you have a lot of patience and dexterity.

Me....not so much!  I never have seen the point of this.

But......if you are one of the many Mason jar lovers.....you can buy this insert to create a grid for your flowers.  Not a bad idea.


Chicken Wire or Rabbit Fencing

Using chicken wire is a cost effective alternative to floral foam.  It is not as easy to work with, but it makes a strong support grid for stems. 


Chicken wire is kind of "pokey" and you need a tin snips to cut your piece to size.
Using plastic "rabbit fencing" solves those problems.  The plastic can be used over and over again.

You can buy the plastic mesh fencing at most garden stores.  25 feet is a lot...maybe you could split it with a friend or two.

Since we have rabbits eating our plants...we had this lying around here!


The piece of the plastic is cut to size and pushed down into the container.

The flowers are easy to arrange using this grid support.

Foliage as Support

Sometimes you are working with a clear glass container.  You don't want to see the floral foam or wire.  Using sturdy leaves from your perennial plants is a way to provide support.  This works especially well with shallow arrangements.


Pachysandra, Hosta, a Peony leaves are especially good choices.

Curly Willow or Grape Vine

A twist of curly willow or grapevine inside a clear vase makes an interesting and organic support.
I didn't have any example photos of my own.....so I went out and found these pretty ones.  You do have to change the water often if you use this method because the willow or grape vine does "muddy" the water.


Flirty Fluers
source


I hope these ideas are some you can use when you arranging your flowers.

Have A Wonderful Day!


Wednesday, March 8, 2017

Instant Spring in Ten Minutes for Ten Dollars!

This is the time to start looking for signs of Spring!


One of the sure signs of Spring is the arrival of the Primose plants at the Home Depot!

 Mr. S and I were there yesterday!

Ah Hah!  There they were.  2/$5

I figured it was worth spending $10 on a little bit of Spring that would last longer than the usual bunch of tulips.


The copper bowl (from Goodwill) was the perfect holder for the four little plants.
It was a simple matter of plopping them in there and adding a bit of Spanish Moss.
Spanish Moss is one of those "little things" that is great to have around to add a nice touch to planters.
Primrose plants need to have the spent flowers picked off to keep them blooming. If I am lucky, I will keep these around until it is warm enough to plant them outdoors....wish me luck!


There you have it.....Ten Minutes.....Ten Dollars.....Instant Spring!
Have you ever wondered about the old saying about being led down the "Primrose Path"?
  
The primrose path refers to someone living a life of ease and pleasure. Not to be confused with "led up the 'garden path'", which is an idiom suggesting that one is being deceived or led astray.

It would be nice to think that at Sweetwater we live that life of ease....and frolic down the Primrose Path.....but sometimes I think it is more likely that the garden path is our destination!


www.barbclarke.com
 Think Happy Spring thoughts today....it is only about 2 weeks away!
Link Parties
Happiness is Homemade
Create With Joy 
Life On Lakeshore Drive 
Nifty Thrifty Things 
The Fabulous Party

Friday, November 11, 2016

Cornucopia 2016


Source
What could be more iconic than a cornucopia at Thanksgiving?

The cornucopia (from Latin cornu copiae) or horn of plenty is a symbol of abundance and nourishment, commonly a large horn-shaped container overflowing with produce, flowers or nuts. The horn originates from classical antiquity, it has continued as a symbol in Western art, and it is particularly associated with the Thanksgiving holiday in North America. (Wikipedia)


This is the 2016 version here at Sweetwater.
I used a collection of artificial fruits and vegetables
with bittersweet, magnolia leaves and pheasant feather accents.
It is finished off with a burlap bow.


Tuesday, August 30, 2016

Quick Flower Arranging Tip

Hurrah! The Zinnia's are in full bloom!
These garden flowers make wonderful flower arrangements.

I have been using a "ball" of chicken wire to support the stems in my Zinnia arrangements this summer.
A big roll of this stuff is great to have on hand in your supply closet.
I still love fresh floral foam to support stems, but the chicken wire is reusable, making it a thrifty choice!

Tuesday, June 7, 2016

Friday, September 4, 2015

Hydrangea Tips and Tricks

Hydrangeas are to late Summer what Peonies are to Spring!
 Big
Lush
Beautiful!
 You have to love this sentiment!


This post is not about growing hydrangeas.

 I want to talk about using Hydrangeas in floral arrangements.

If you don't grow them or know where to beg, borrow or steal them, you probably know that each bloom can cost upwards to $5 a stem.....YIKES!

Hydrangeas can be a bit tricky. So it really helps to know some tricks to keep them from flopping!

Sunday, May 18, 2014

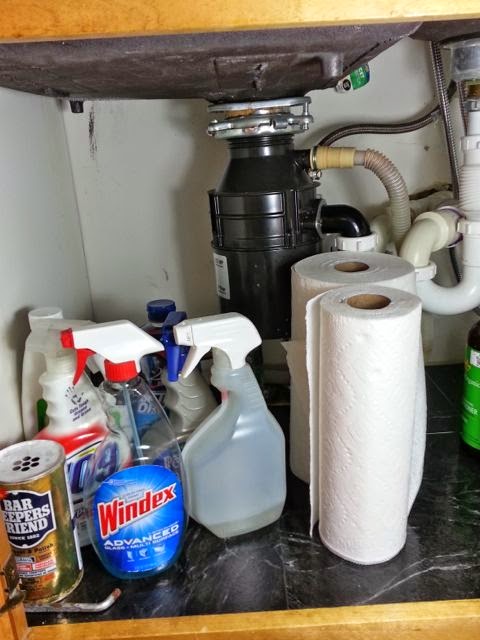
Under the Kitchen Sink! A Cautionary Tale!

On a scale of 1 to 10 cleaning the cupboard under the Kitchen sink is probably a 1or maybe lower!
Face it....if you can find the soap and cleaning supplies at the front....
it is better not to look way into the back recesses...
you never know what you might find!

Never the less.....my to do list included redoing the shelf paper under the kitchen sink....and the time had come!

The idea of using 12 x 12 stick on vinyl tiles was one I had seen a while back on someone's blog!  (If you are that someone....let me know so I can give you credit!)
Anyway........I bought 8 tiles at Home Depot....for 79 cents a piece....and the project was "under" way!

Low and behold....when I took all the stuff out of the cupboard.....I discovered that there was a LEAK!   Not a pretty sight!

I waited to take this photo until after I cleaned up the mess....just in case you were having a snack while you were reading!

Anyway....see all the curly cue pipes and "STUFF" that has to do with water and drains and garbage disposal......apparently they somehow got loosened and were leaking slowly and making a big mess!


 Since Mr. S is the plumber around here....(have I ever told you how nice it is to have someone who understands all those curly cue pipes around?...Well really nice)

He was able to fix the problem leak and I could get on with my project.


The process was pretty simple....

Peel Stick Repeat!


Peel Stick Repeat!


Obviously there were a few spots to cut around...

But remember.....this is under the kitchen sink...
That same spot that I didn't know was a leaky wet mess because I never look tooo far back.....


So perfection was not an issue on this project!


I did care enough to use the square and a carpet knife to get a straight edge for the long cuts... 


But otherwise.....I just "eyeballed" it for the cuts around the pipes in the back!


I don't think I did too bad on those....what do you think?


So now the cupboard should be easy to keep clean....I said clean....NOT NEAT....that is something that is probably never gonna happen!

Project Cost......$6.42 for tile
Time.....about 15 minutes to install
 "truth in blogging" has the project costing a bit more if you throw in the extra trips to Home Depot for plumbing supplies and the time to let the "plumber" work!

Hope you have a week with only "good" surprises!
I am waiting patiently for the yard to dry out enough to get out and plant....it promises to be a beautiful day!


Saturday, March 15, 2014

Signs of Spring-Pussy WIllow and Forsythia!

Wow!  
A week with NO below zero temperatures!  
A week with NO new snow!
When the temps hit 40° all the kids on the playground shed their coats!
It must be SPRING!

I took a couple of minutes to brighten up the mantle this week!
My inspiration was this gorgeous painting I found on a wonderful blog!
Eat Drink Paint by Kim Rempel is pure visual candy!

Source
Since I can't spend the money on the painting (it is sold anyway!)
I decided to create an arrangement that mimics the art piece!


I had a spray of artificial Forsythia and some Pussy Willow branches saved from last spring!

I use to try unsuccessfully to create arrangements by bending the branches of artificial flowers while they were still clumped together on that big plastic stem!
I finally learned to treat the artificial spray like "REAL" flowers and cut them to size!  
That red handled tool in the picture is a real godsend.....it clips through the plastic and wire "like butter"!


I didn't have any of the dry floral foam you are supposed to use for artificial arrangements....but since my motto is "use what ya got"... a block of fresh floral foam (used dry) worked just fine for this project!


Cutting the branches apart allows for an freer and more natural arrangement of the Forsythia!
Then it was just a matter of adding the Pussy Willow!
By the way....did you know that the fuzzy gray thing on the branches are actually called "CATKINS"?


The floral foam was showing.....so a little Spanish Moss was added to hide it!


Now the mantle looks a bit more seasonable!
Now if only the snow outside would melt.....the real signs of Spring could start to show up!

Have A Great Day!
Related Posts Plugin for WordPress, Blogger...