Showing posts with label kitchen. Show all posts

Sunday, October 23, 2016

How to Clean Cast Iron

The pots and pan cupboard here at Sweetwater is really pretty basic.
We have a set of Calphalon cookware that has been around for a lot of years.
We also have some great cast iron pans that are real work horse pieces.
These have been around for even more years.


 These pans, a frying pan, a round griddle and a reversible double burner sized griddle get a fair amount of use because of their versatility.

A well-seasoned cast-iron skillet is naturally non-stick. ...

Cast iron cookware retains heat — that is, they stay hotter —

Cast iron pans can be used on the stove top as well as in the oven.

And did you know that cooking with cast iron pots and pans can boost your iron intake.


Friday, January 29, 2016

Painting the INSIDE of the Kitchen Cupboards!

Cleaning and organizing the kitchen cupboards is a great project at this time of year.  I started to do just that at the beginning of the month.

In the process....I looked...really looked at interiors of the cupboards!
YIKES!

The melamine laminate has the scratches and scuffs that come from normal use over time. The original white has become dull and yellowed.

I decided that they need a fresh coat of paint.

Tuesday, March 24, 2015

Chalkboard Art Tips and Tricks


I did a lot of chalkboard writing " back in the day" before Smartboards replaced them.                                    I was pretty proud of my "teacher penmanship" skills!
It is humorous that chalkboards are " historical artifacts" in the classroom, and yet, those same chalkboards have become popular home decor accents!

I have a big chalkboard in the stairwell to the lower level


I recently found a cute little easel chalkboard at a consignment shop that fits perfectly on the kitchen counter.


I usually write something seasonal on the chalkboards.....but in all honesty...I have been feeling that my efforts would not get very good grades for creativity and penmanship!

 I decided it is time for me to spend some time perfecting....or at least improving.... my chalkboard art skills.
I guess that might be an irony goal for a retired teacher....but heck...I have nothing but time now!

Here is a round-up of all the great tips and techniques that are sure to turn my chalkboard art from novice to pro!

Sunday, May 18, 2014

Under the Kitchen Sink! A Cautionary Tale!

On a scale of 1 to 10 cleaning the cupboard under the Kitchen sink is probably a 1or maybe lower!
Face it....if you can find the soap and cleaning supplies at the front....
it is better not to look way into the back recesses...
you never know what you might find!

Never the less.....my to do list included redoing the shelf paper under the kitchen sink....and the time had come!

The idea of using 12 x 12 stick on vinyl tiles was one I had seen a while back on someone's blog!  (If you are that someone....let me know so I can give you credit!)
Anyway........I bought 8 tiles at Home Depot....for 79 cents a piece....and the project was "under" way!

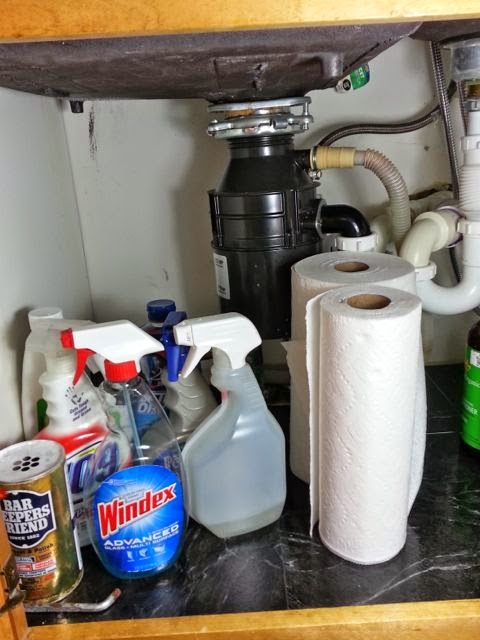
Low and behold....when I took all the stuff out of the cupboard.....I discovered that there was a LEAK!   Not a pretty sight!

I waited to take this photo until after I cleaned up the mess....just in case you were having a snack while you were reading!

Anyway....see all the curly cue pipes and "STUFF" that has to do with water and drains and garbage disposal......apparently they somehow got loosened and were leaking slowly and making a big mess!


 Since Mr. S is the plumber around here....(have I ever told you how nice it is to have someone who understands all those curly cue pipes around?...Well really nice)

He was able to fix the problem leak and I could get on with my project.


The process was pretty simple....

Peel Stick Repeat!


Peel Stick Repeat!


Obviously there were a few spots to cut around...

But remember.....this is under the kitchen sink...
That same spot that I didn't know was a leaky wet mess because I never look tooo far back.....


So perfection was not an issue on this project!


I did care enough to use the square and a carpet knife to get a straight edge for the long cuts... 


But otherwise.....I just "eyeballed" it for the cuts around the pipes in the back!


I don't think I did too bad on those....what do you think?


So now the cupboard should be easy to keep clean....I said clean....NOT NEAT....that is something that is probably never gonna happen!

Project Cost......$6.42 for tile
Time.....about 15 minutes to install
 "truth in blogging" has the project costing a bit more if you throw in the extra trips to Home Depot for plumbing supplies and the time to let the "plumber" work!

Hope you have a week with only "good" surprises!
I am waiting patiently for the yard to dry out enough to get out and plant....it promises to be a beautiful day!


Monday, December 30, 2013

Pasta Bar For a Crowd!

Four Parties in Six Days!
What was I thinking?
Yep....counting:
 Christmas Eve.... 
Christmas Day....
A Cocktail/Fondue Party...
 and finally a Pasta Buffet yesterday...
There was lots of celebrating here at Sweetwater!
We had lots of fun through it all....
(but I do have to admit that I am a bit tired of cooking)


I had never attempted a pasta buffet before.... 
there were some moments when I wasn't sure it was going to work....
but we were pleasantly surprised at how smoothly it all went.
In fact....this might just become a go to menu for future gatherings!

The menu was simple:

Kale Salad
Caesar Salad
French Bread
Spaghetti Sauce Bolognese
Swedish Meatballs in Gravy
Alfredo Sauce w/chicken-broccoli-roasted peppers
Fettucini and Wide Pasta Noodles

 Various Desserts and Sweets contributed by the guests
Swedish Rice Pudding w/Lingonberries


Recipes Tricks and Tips

  • Best recipe for chicken strips for the Pasta:  Buy them.....Already cooked....in a package....  The texture and taste of the already prepared chicken strips from CostCo were more than acceptable when covered with sauce!


  • DON'T blanch your broccoli ahead of time....I thought this was smart and did it to save time....except I left it in the pan with the cover on and ended up with mushy over cooked vegetables....won't do THAT again!


  • Cook the pasta ahead of time and keep it in the oven with the absolute lowest temp....in fact...I kept turning the oven off to just have the tiniest bit of heat.  The pasta was in those aluminum catering trays.   A little pasta water poured over the pre-cooked noodles brought them "back to life" when it was time to put the pasta on the table.  (a warming tray kept the temp "lukewarm")  This also allowed an easy replenishing of the pasta when needed.


This Sweet Kale Salad from CostCo is a new favorite at Sweetwater.  It comes with all the fixings. Just pour into a bowl...add the dressing and "stuff" that is included and enjoy!  It was simple enough to make a second batch when it ran low during the party....maybe people thought a little crunchy greens would make for something "healthy" given the decadence of all the pasta!


  • The Bolognese sauce was "almost homemade" by using prepared Spaghetti sauce with meat and spices added.  I really made this for the kids....but the "big" kids seemed to enjoy it too!


  • I sort of stressed out about finding the "perfect" Alfredo Sauce that could be made ahead!  This recipe worked very well....in fact the teenage boys at the party told me they thought this would be great for their own sports "Pasta/Carbo loading parties....which I took as a "high compliment"
Do Ahead Alfredo Sauce
1/2 cup real butter
3 TBSP Cream Cheese *nuefantel worked fine
2 Cups Heavy Cream
1 Cup grated Parmesan  (store brand cheap stuff worked fine)

Melt the butter, cream cheese and cream in a saucepan,
Add the cheese and stir until it is completely incorporated.
Cool and keep until you are ready to heat it up in the microwave and put in the crockpot to serve.
YES....it is that simple!
Simple....but rich, rich, rich and YUMMY!
This sauce stood the test of sitting for more than 4 hours on the buffet without losing texture or taste!
It is definitely a KEEPER!

  • Mr. S decided that pouring frozen bags of prepared meatballs and adding mushroom soup and beef broth would NOT do for this buffet.  He painstakingly prepared meatballs from SCRATCH using a recipe from his mom's Swedish Woman's Cookbook!  I have to say they were delicious!  (maybe I can convince him to write a guest post and share the recipe with you some day!)

  • Add some crusty sliced bread and butter.....A bowl of nice Parmesan Cheese and you are DONE!

The party was lots of fun and there were plenty of entertaining activities!
....the Vikings WON the final game in the Metrodome....Surprise!
....The Packers pulled off a last minute victory.....amazing!
....the slide show on the computer of hundreds of digitized slides of the family history going back 50 years made for some wonderful trips down memory lane!
Now.....I am going to heat up some of the leftover Cider.....start a fire.....and read a good book....
ALL DAY.....since it is 10 below zero outside and I don't have anywhere to be!
Have a Great Day!

Saturday, November 30, 2013

Free Photo Editing Software iPiccy

I am in full on decorating mode here at Sweetwater!
The house is a disaster.....boxes.....ribbons....greens....
I will share some of the decor in the next posts....
BUT....
I discovered the coolest on line Photo Editing Site and just had to share with you!

 These are a couple of collages that I made!
Super simple and intuitive to use!
 The images above are snaps of the decor in the kitchen!
I am especially loving the Goodwill copper bowl filled with the stuff I took out of the cornucopia and the gorgeous Goodwill pears!
The wreath was a bit tricky to hang....good that the Sweetwater daughter stopped by to be my spotter!
I always lean a seasonal image in the back of the stovetop!
The little bells hung on the back of the chairs are sure to bring Marvin fun times!


I found the cutest Christmas card with Santa scratching the kitty....
hey...every cat needs art when they eat!
The other prints are also framed Christmas cards....
The bell swag is a cheerful sound coming and going through the garage!


iPiccy
Now back to iPiccy

At first I thought that it would be pretty basic!
But the professional touch up tools are almost as good as some in Photoshop and so much easier.....

The one draw back is that there is no straightening tool....so I still used iPhoto for that...

Anyway....just had to share and think it is worth your time to take a look!


Now back to the boxes....and greens...and bows OH MY!

Have a Great Day!


Monday, November 11, 2013

Cornucopia 2013


 Cornucopias or a Horn of Plenty are the epitome of Thanksgiving decor.

I put one together each year....

Every year it looks a little different.


Here is a trip down memory lane to see the last couple of years of Cornucopia Design!

How to Arrange a Cornucopia Tutorial

The Cornucopia done for a silent auction last year


This is the one that sat on the dining room table last year.....and the post about it HERE gives the history of cornucopias as well as some tricks for doing the arrangement.

This year.....I had a new wicker cornucopia....from GOOD WILL of course...
I saw a lovely mum plant in the grocery store that was the perfect orange color for the kitchen....
HMMMM....I knew that it would be a great base for Cornucopia 2013!

I began by putting the mum plant into the center....yeah I know it is on it's side...but it is freshly watered and will only need a drink every week or so....and because the whole thing is on a tray it will be simple enough to lift it up to water!  (at least that is the plan :)  )


I love the way the flowers and fruit look don't you?


I decided to use the real fruit that is always just sitting around....and yes....we will eat this and replace it with more!  By the way....those pears are actually FAKE....I bought a whole bag of them at GW for $7....they look amazingly real!  Mr. S even tried to eat one the other day!!!


The real trick for doing this is to put the whole thing on a base....this year I used a silver tray because of the whole thing with watering the fresh plant.  The reason for the base....is to be able to move the arrangement when it gets in the way....which since it is on the kitchen island is whenever we want to cook!!!!


So this is the pretty sight that greets us when we walk in the kitchen.....Nice don't you think?

I hope this inspires you to try to arrange your own Horn of Plenty....
Link up your own creations in a comment...I would love to see them!

Have a Great Day!

Friday, September 9, 2011

A Goodlooking Dishsoap Dispenser!


Call me crazy, but I hate looking at the bottle of dish washing liquid sitting next to the sink!
I used to hide the bottle under the sink....but none of the other people in the house ever put it back there...
so it was always sitting there.
Now you are probably saying....."in the giant scheme of things....this is a pretty SMALL thing to get hung up on!"
Yeah....but I found a simple, thrifty, stylish way to solve the problem....SO THERE!

And....my solution saves soap too!
Wanna know how?   Read on!
Related Posts Plugin for WordPress, Blogger...