Showing posts with label gifts. Show all posts

Thursday, December 14, 2017

Gift Idea: Tea Towel in a Frame

Two weeks until Christmas!
That means that there isn't a lot of time around here for writing blog posts.
My goal is to do a few posts with a ideas that you might use to save time and/or money during the holidays this year.

Frame A Tea Towel for Statement Wall Art

Inevitably, you are going to be going shopping in one of those cute gift boutiques....
Inevitably, you are going to fall in love with lots of items that are way out of your price range....
Don't despair!
Check out the tea towel section....you will probably find something very cute for a reasonable price.
AND...
Tea Towels make fabulous gifts....
BUT...
Why not take it up a notch and frame that tea towel to create a statement piece of wall art?


I found this towel at a gift boutique....yeah...I know I said this was about giving gifts...but I loved it so much I had to keep it for myself. (note to self: next time buy TWO of something thrifty that you love).
I already had the frame, but you can find deals on poster frames with the mat already in them.  Michaels and IKEA are good sources.

The HOW TO is simple:
1. Buy the tea towel.
2. Buy the frame.
3. Iron the towel.
4. Use spray adhesive to smooth the towel on the backing cardboard that comes with the frame.
5. Reassemble the frame.
6. Wrap it up!


Be sure to tell the person you are gifting how easy it is to change out the "art" for each season!


I have written about this before with more detailed instructions and some good sources for tea towels.
Tea Towel Wall Art: http://sweetwaterstyle.blogspot.com/2017/04/tea-towel-wall-art.html

Sources for Tea Towels http://sweetwaterstyle.blogspot.com/2015/01/wall-art-from-tea-towel-and-interesting.html

Remember when every 1960's kitchen had a calendar tea towel? (well....some of you are too young to remember that....but trust me)
A framed calendar tea towel is an easy way to go beyond the ordinary...and way cuter than the one on your phone!

How cute are these towels from Spoonflower.com?


Hope this has given you an idea for a last minute gift if you needed one!

Have A Great Day!

Monday, November 27, 2017

Hostess Gift Tutorial Day 2: DIY Gnome!

Nothing says Scandinavian Christmas like a Tomtem, Gnome or Elf!
Why not make one of these charming little fellows for a hostess gift?


You probably have the supplies on hand.  If not, a trip to the thrift store will get you everything you need to make a bunch for only a few dollars.


Supplies:


Toilet paper tube or 3 inch birch log

Styrofoam ball

fiberfill

some kind of "beard material"....fiberfill, an old halloween wig, sheepskin

Old sweater sleeves

Wooden Bead

Hot Glue Gun

Sewing machine or needle and thread.


Directions:
  • Cut off a sleeve of the sweater you are using for a hat.  Use the bottom ribbing for the bottom of the hat and machine or hand stitch the side into a cone shap.
  • Cut a rectangular piece of the body sweater fabric to wrap around the toilet paper tube.  Tuck the ends into the tube opening and glue down. (Skip this step if you have access to birch logs)
  • Wrap fiberfill around the styrofoam ball and glue to the top of the tube or log piece.
  • Add a longer piece of the fiberfill to create a beard.  If you are going all out...you can purchase sheepskin remnants.  I got mine at Axe Man Surplus for $1.00.  You will want to glue the beard from the top of the head.  These Tomtens don't have faces....just facial hair.
  • Stretch the hat on the head....position it so that your little guy has some charm.
  • Glue the wooden bead onto the center of the "face".

In little or no time, you have a fun hostess gift.  If you want to go all out Scandanavian....you could head to IKEA for some Lingonberry Jam to add to it.  I am sure there are other Scandinavian treats that would make good additions....as long as it ISN'T Lutefisk.


Speaking of Lutefisk....I just finished a great book that will call to anyone with Minnesota roots...

A quirky and interesting read.


Have A Great Day!

Link Parties
Sunny Simple Life

Saturday, November 25, 2017

A Week of DIY Hostess Gift Tutorials


Things are pretty much in full holiday mode around here....although since we are having a late Thanksgiving "gather and gobble" on Sunday....Mr. S has requested that I restrain myself a bit and leave a few remnants of fall decor....so the house feels a little like Thanksgiving.

Some of you may have noticed that I have been struggling to get posts written on a regular basis...
I have decided to change that!
I have a Goal: I plan to post EVERY DAY this week with quick tutorials for easy to replicate hostess gifts.  I hope this goal will motivate me to post more often....and inspire you to get your craft on!
So here goes!

DAY ONE
Coverless Book Bundles Holiday Style

Source


Coverless book bundles were all the rage a few years ago.
They are the epitome of "shabby chic".


Shabby Chic is not for everyone....but...if you change it up to have a HOLIDAY theme....then these work for almost any decor style.

Do you know how hard it is for a retired "librarian" to rip the cover off of a book?
Well...I had to get over that for this project.
Since I promised you a tutorial....a tutorial you shall have...(even though I believe MY clever readers are all be smart enough to figure this out on their own!!!)


  •  Find some old books....the thrift store is a great source if you don't have any lying around.  The older and dingier the better!  Look for groups of books that are similar in size. 
  •  Remove the soft casing of the book and make sure to remove any printed pages that precede the blank page. Most books have one blank page before the work of the book begins, so you want to leave that page as the top “page” of the book. When you remove the cover, don’t worry about peeling off the binding, the more weathered your binding looks, all the better for the look of your bundle. 
  • Play around with stacking your books.  It will all depend on the books you have.
  • Add your holiday sentiment.  I used the PRINT ON FABRIC technique to print the words on strips of canvas.  You can just use a fabric marker or sharpie to write your words.  Any kind of glue works to add the strips of canvas to the spines of the books. 
  • Wrap the books with a fun holiday ribbon just like you would wrap a  present. You can tie a bow or not tie a bow. It’s up to you.
You have just created a holiday themed vintage book bundle!
This is a perfect hostess gift. It takes little time and only costs a couple of dollars (or free if you use your own old books).
You will probably want to make a few so that you have one for your own!

Have  A Wonderful, Crafty Day!
Stay tuned for tomorrow's Tutorial!


Sunday, December 18, 2016

Gift Wrapping for a Neat and Tidy Christmas Morning!!

Every year....I promise myself to get all of the holiday shopping done early!
Every year....I totally fail at actually doing it!
I know I am not alone....
otherwise why would a google search for last minute gifts get 18,000,000 hits?
Source

Tuesday, May 31, 2016

Stuff to Buy at Goodwill: Make Your Own Fancy Cards!

 Here is another post in the "Stuff to buy at Good Will" Series!

Check out the aisle with the office supplies and cards!
You can often find whole wedding invitation kits for a down and dirty price.


 You don't have to have a wedding in your future to use the lovely paper, notecards, stickers, and other great stuff in those boxes.


Monday, May 25, 2015

Quick Gift Bag Ideas and a Tutorial!


As May winds to an end.....Graduations and End of Year Thank-yous are upon us! 
I have to admit that I often give gift cards for these events!  
Graduates AND Teachers love gift cards!
The trick to making a gift card personal is the presentation!


These are the simplest little gift bags that you can make using a single piece of  decorative scrapbook paper!


I like the fact that there are two little pockets on bag.

One side for the gift card....
The other side for a heartfelt note!

Remember that those notes to thank the teacher are actually MORE appreciated than the actual gift.... In fact...you wouldn't even need a gift..just have one side include a thank-you from your student and the other side from you!


Monday, November 10, 2014

Thrifty No Stress Entertaining Tips!

The Baby Shower in honor of the soon to arrive 
Sweetwater Grandbaby was so much fun!

As usual....I didn't take very many pictures!
I suppose THAT is because the party was SO MUCH FUN!

Instead of beautiful pictures of all the perfectly arranged tables and decor.....
I thought you might be interested in the way this party went together with almost NO stress!
So here is the stress free party planning edition of:

 Decorations don't need to be decorations!
HUH?
Running all over to buy or make kitchy decorations is expensive and time consuming!
 Now...I like to craft as much as the next woman...but adding that to party prep isn't necessary!
  I spent 10 minutes searching for cute ideas for baby themed blackboards....and a little time copying it....big impact.....no money!

For sure this is staying up well past when the baby actually  arrives!

This baby buggy is actually the one MY MOM was wheeled around in....a far cry from the high tech strollers of today....but way more charming as the spot to collect the shower gifts!  Another decor statement for no cost.....unless you count the cost of Mr. S having to wrestle it out of mom's basement, into the truck and into the house!  So maybe NO stress doesn't actually work here!!!!
The two enlarged photos of the new parents was the simple decor in the diningroom/beverage center!  Simple and easy to do ahead of time!


To COOK or NOT TO COOK!

Sometimes using prepared food is actually cheaper than making it!


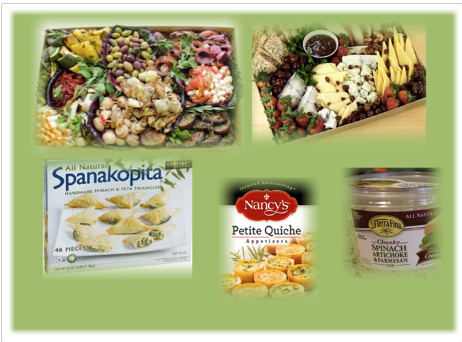
Since this was an "Happy Hour Baby Shower"...the menu was hearty appetizers! The thrifty/no stress approach here....buy it almost ready made!


Imagine buying and grilling and marinating 8 different vegetables...
Imagine buying and cutting up fancy cheeses and the fruit and nuts to make it pretty!
That would actually be a lot more expensive and add a lot more stress than ordering the trays already made.  The two trays from Whole Foods made four big platters for the buffet. Since people arrived over a span of time....it was great to be able to bring out totally fresh platters mid-way through the evening.

Cost Co has an amazing (and cheap) array of frozen appetizers....again cheaper than making them!  72 little quiches for $9 and 48 Spanakopita for $5....and they are really tasty. 
The ready made Artichoke dip is also a steal....buying the ingredients...much less mixing it up would be at least as expensive....and of course...more stressful!


I Get By With A Little Help From My Friends!

This party was not a one woman show!
The Sweetwater fiancée was instrumental in planning and orchestrating the event.  Not only does that reduce stress....it makes it a lot more fun!  

She was in charge of the desserts....so I can't speak for her....but it was stress free for me when this array of yummy treats arrived!
The miniature Red Velvet Whoopie Pies were the star of the show!
Who doesn't love lemon bars?
The super skinny little cookies came from Trader Joe's....these are something I keep stocked in the gift cupboard...they make perfect hostess gifts!

Of course....I have no pictures of the little red dessert cups that went with the black and white striped ones...but trust me....they were very very cute!  
Putting the desserts in the little cups made it easy for people to "graze" and enjoy them without a plate!

Speaking of PLATES!


There is no need to keep shopping and buying paper party goods that end of in the trash...I would find THAT stressful....

This stack of dessert plates came from the whole collection of china that was purchased from Goodwill for the Sweetwater Daughter's wedding.  
Instead of renting dishes and glassware for a couple of hundred dollars...we spent fun times buying them at the thrift store!


They are unique and infinitely more interesting than catering dishes....and the best part is that now these dishes can be reused for lots of parties!  A couple of loads in the dishwasher has to be better for the environment than all that paper trash!  


Have Wine Glasses....Will Travel!

I don't know about you....but I HATE drinking wine out of plastic glasses!  Again....I have purchased a bunch of small sized wine glasses at the thrift store over the years!  They are perfect for parties....but would take up lots of space in the cupboard....that space is reserved for the BIG wine glasses.

Instead of storing them in a box on the shelf.....I keep them wrapped in a towel in a picnic basket that actually sits out as display in the family room! 
HUH?  Why is that better than a box on the shelf?
  • Because the picnic basket has handles and is easy to carry around!
  • Because you can set a few glasses out on the table....and set the basket aside to add more fresh glasses as the party goes on!
  • Because the basket isn't taking up shelf space!
  • Because my friends know that I have these glasses and I can deliver them to parties on request!


Use What You Have....Thank You Favors!

How clever of the Sweetwater Daughter....this is sooo thrifty...but I am not sure about the stress...I will have to ask her!

  • she knew the succulent pallet garden on her deck would fall victim to the winter frost....
  • she had a bunch of little glasses from Good Will...
  • She wanted something to use as a favor to thank her guests for coming....
Her solution....these clever little miniature gardens!

Sitting on the table in the entryway....they were the perfect send off for everyone!

I am thinking that most people would trade this for a formal thank you note.....that would reduce some stress!


Choose Your Guests Wisely!

The guests really are the most important ingredient for any party!
I am not being funny when I say to choose them wisely!
One of the reasons that this party was so much fun....the people!

The mix of friends from different areas of life....family...and some pretty cute kids....made the atmosphere entirely stress free.....so stress free that it went well beyond the advertised time frame!  That is my idea of a party!


Have A Wonderful Day!
Link Party Goodness
Coastal Charm   House on the Way  

Monday, June 9, 2014

Peony Time At Sweetwater Plus a Trick You Need to Know!


Peonies are my absolute favorite flower!   When these flowers burst into bloom, it means that summer is really here. 
I always feel "rich" when these showy flowers bloom!  
They are the epitome of abundance!.  
If you don't have a peony bush or two (or in our case 17), I would certainly think about planting one.  If you don't have a garden, go visiting your friends who do.  
I am always happy to share my peonies.....because they don't last long, they might as well be enjoyed!                                                            

A bouquet of these beauties make  great gifts....just in time for end of the year thank-yous and hostess gifts.

In fact....the Sweetwater Peonies were the flowers in the Sweetwater Daughter's Bridal Bouquet!

Wonder how much money I save not having to go buy something?
Now I know why I spend all that time weeding!

Last year wasn't the best year for our plants.  They just didn't have the look of "excess" we are used to.  We did some fertilizing and got the support cages up early this year.....and I think it made a difference!


These are photos from a couple of years ago....as I write this....it is still so early it is too dark out take pictures!  I will get some shots later and update the post!


Garden Treasure
 Over the years we have added heirloom plants rescued from my mother-in-law's yard when we sold her house. I think these plants came from her mother's farm.  Another favorite is the yellow "Golden Treasure", that was a father's day gift.  We are gradually adding special variety plants like the showy "Coral Charm".
Coral Charm
Enough with all the photos

DID YOU KNOW?  You can keep peony buds in the refrigerator for up to 6 weeks and use them in arrangements anytime!  This is how florists are able to have peonies for such an extended time!

I learned this little trick 5 years ago when we needed to be sure to have a wide variety of flowers for my daughter's wedding.

It is soooo simple!


Start by picking peony buds that are at "marshmallow stage", meaning just at the time that you see color on the bloom.  Cut them quite long (at least 12 inch stems).  Wrap them in newspaper and put them in the refrigerator.  They will look wilted, but don't worry!  When you want to use them, make a fresh cut on the stem and put them in water for 8-10 hours.  The water will start perk up the foliage and the flowers will open up....just like magic!


It really works....check out this post showing the flowers after they have been in the refrigerator for 3 weeks!

Before I go....look at the gorgeous peony paintings I found on this website!


They are simply beautiful....and reasonably priced too!
Now that would be a way to really extend the peony season....hmmmmmmm!

Have A Great Day!

Link Parties

Creativity Unleashed  I Am Not A Trophy Wife   


Related Posts Plugin for WordPress, Blogger...